Small Batch Vanilla Pear Preserves – Easy Homemade Recipe
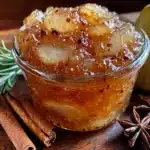
This small batch vanilla pear preserves recipe is simple enough for a Tuesday night, but special enough to give as a gift. It uses ripe pears, a vanilla bean, and a little patience to create a soft, spreadable preserve with a cozy depth of flavor.
- Prep Time: 20 minutes
- Cook Time: 30 minutes
- Total Time: 50 minutes
- Yield: 2 cups (about 2 eight-ounce jars) 1x
- Category: Preserves
- Cuisine: American
Ingredients
Scale
- 2 pounds ripe but firm pears (about 4–5 medium pears, peeled, cored, and diced into ½-inch pieces)
- 1 ½ cups granulated sugar
- 1 vanilla bean (split lengthwise, seeds scraped)
- 2 tablespoons fresh lemon juice (about half a lemon)
- ¼ cup water
Instructions
- Prepare the pears: Peel the pears, cut them in half, and remove the cores. Dice the pears into ½-inch pieces. You should have about 4 cups of diced fruit. (Pro tip: work quickly and toss the diced pears with a little lemon juice to prevent browning.)
- Split the vanilla bean: Using a sharp paring knife, split the vanilla bean lengthwise down the center. Use the back of the knife to scrape out the tiny black seeds. Don’t discard the pod—it still has tons of flavor and will go into the pot.
- Combine ingredients: In your large pot, combine the diced pears, sugar, lemon juice, water, vanilla bean seeds, and the empty vanilla pod. Stir everything together with your wooden spoon until the sugar starts to dissolve.
- Maceration (resting) time: Let the mixture sit for 15-20 minutes. This allows the sugar to draw out the pears’ natural juices, which helps everything cook more evenly. You’ll notice the pears start to look glossy and the sugar turns syrupy.
- Start cooking: Place the pot over medium-high heat and bring the mixture to a boil, stirring occasionally. Once it reaches a full rolling boil (bubbles that don’t stop when you stir), reduce the heat to medium-low.
- Simmer and stir: Let the preserves simmer gently for 25-35 minutes, stirring every few minutes to prevent sticking. You’ll notice the mixture thickening and the pears becoming translucent. The color will deepen to a lovely golden amber.
- Check for doneness: To test if your preserves are ready, place a small plate in the freezer for a few minutes. Drop a teaspoon of the hot preserves onto the cold plate. Let it sit for 30 seconds, then push it with your finger. If it wrinkles and doesn’t run back together, it’s done. If it’s still runny, cook for another 5 minutes and test again.
- Remove the vanilla pod: Fish out the empty vanilla bean pod with your tongs. Rinse it off and let it dry—you can bury it in a jar of sugar to make vanilla sugar later!
- Ladle into jars: Using your canning funnel, carefully ladle the hot preserves into your sterilized jars, leaving about ¼ inch of headspace at the top. Wipe the rims clean with a damp paper towel, then screw on the lids.
- Process or refrigerate: If you plan to store the preserves at room temperature, process the jars in a boiling water bath for 10 minutes. If you’re going to eat them within a few weeks, just let them cool to room temperature on the counter, then refrigerate.
Notes
Don’t skip the maceration step—it draws out the pears’ natural juices. Use a wide pot for faster evaporation. Watch for scorching, especially toward the end. The cold plate test is foolproof for checking doneness. The preserves taste even better after a day or two in the fridge as the vanilla flavor deepens.
Nutrition
- Serving Size: 1 tablespoon
- Calories: 50
- Sugar: 12
- Carbohydrates: 13
- Fiber: 1
Keywords: vanilla pear preserves, small batch preserves, homemade jam, pear jam, vanilla bean preserves, easy preserves recipe, gift jam