Love this? Save it for later!
Share the inspiration with your friends
“Last Fourth of July, I wasn’t planning on making a fuss with dessert. I had just popped over to my neighbor Diane’s for a quick chat about the fireworks schedule when the smell of vanilla and fresh berries hit me before I even stepped through her screen door. Diane wasn’t making a big deal of it—just casually sliding a pan of these Perfect Stars & Stripes Cheesecake Bars into the oven like it was no big deal. Honestly, I stood there for a moment, caught off guard by how something so simple looked so festive and smelled so inviting. You know that feeling when you think a recipe is going to be complicated, but then you realize it’s just good old-fashioned ingredients put together with a little love? That was this.
She was chatting about how she whipped this up after a quick trip to the grocery store and how it always steals the show at her neighborhood block party. I remember her cracking a bowl full of cream cheese, laughing off a small spill on the counter, and telling me, “It’s just cheesecake bars, but with a little patriotic flair.” I mean, I’ve made cheesecakes before, but this one stayed with me because it’s the kind of recipe you don’t stress about but everyone thinks you put hours into.
Maybe you’ve been there—wanting that perfect festive treat that looks impressive but doesn’t leave you in the kitchen all day. These cheesecake bars fit that bill. They’re the kind of dessert that makes you close your eyes after the first bite and smile, wondering why you didn’t make them sooner. So let me tell you how you can bring a little red, white, and blue magic to your next patriotic celebration with something that feels effortless but tastes extraordinary.
Why You’ll Love This Recipe
After testing this recipe multiple times and tweaking it to get just the right balance, I can say it’s become a go-to for all kinds of patriotic gatherings. Here’s why these Perfect Stars & Stripes Cheesecake Bars deserve a spot in your recipe box:
- Quick & Easy: Ready in under an hour, these bars are perfect when you need a last-minute dessert that still wows.
- Simple Ingredients: No need for fancy or hard-to-find items — everything is probably sitting in your pantry or fridge right now.
- Perfect for Patriotic Celebrations: Whether it’s the Fourth of July, Memorial Day, or any summer BBQ, these bars bring festive flair without fuss.
- Crowd-Pleaser: Kids and adults alike can’t get enough of the creamy texture paired with fresh berries.
- Unbelievably Delicious: The smooth cream cheese layer with the sweet and tart berries on top creates a flavor combo that feels like a mini celebration in every bite.
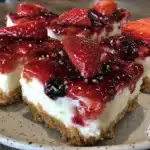
This isn’t just another cheesecake bar recipe. The trick is in the perfectly buttery graham cracker crust and the way the blueberries and strawberries are arranged to mimic the stars and stripes, making it as visually striking as it is tasty. Honestly, the balance of tart berries with the sweet cream cheese filling is something I didn’t expect to nail on the first try, but it’s exactly what makes this recipe special. And hey, if you’re looking to impress guests without breaking a sweat, this one’s your best bet.
What Ingredients You Will Need
This recipe calls for straightforward ingredients that deliver bold flavor and a stunning presentation without any drama. Most are pantry staples, and the fresh berries bring that iconic patriotic pop.
- For the crust:
- 1 ½ cups graham cracker crumbs (about 12 full sheets, finely crushed)
- ⅓ cup granulated sugar
- 6 tablespoons unsalted butter, melted (I like to use KerryGold for rich flavor)
- For the cheesecake filling:
- 16 oz (450g) cream cheese, softened to room temperature (Philadelphia brand works great)
- ⅔ cup granulated sugar
- 2 large eggs, room temperature
- 1 teaspoon pure vanilla extract
- 2 tablespoons sour cream (adds creaminess, but you can swap for Greek yogurt if you prefer)
- For the topping:
- 1 cup fresh strawberries, hulled and sliced (in summer, swap in fresh local strawberries for best sweetness)
- 1 cup fresh blueberries
- Optional: Powdered sugar for dusting
If you want to make this gluten-free, almond flour or gluten-free graham cracker crumbs work well for the crust. For a dairy-free option, try a cream cheese substitute and coconut yogurt instead of sour cream. Honestly, I’ve stuck with the classic version because it’s just so reliable, but these swaps can be handy for guests with dietary needs.
Equipment Needed
- 9×13-inch (23×33 cm) baking pan — I prefer glass pans for even baking, but metal pans work too
- Mixing bowls — medium and large
- Electric mixer or stand mixer — makes creaming the cream cheese smooth and effortless
- Measuring cups and spoons — accuracy helps with consistency
- Rubber spatula — for scraping down the sides of the bowl
- Knife and cutting board — to prep berries
- Cooling rack — optional but helpful for letting the bars cool evenly
If you don’t have a stand mixer, a hand mixer or even a sturdy whisk can work, just take a little extra patience to get the cream cheese lump-free. I’ve also found that a bench scraper helps when cutting perfect squares, but a sharp knife will do just fine. For budget-friendly options, simple glass bakeware and a basic hand mixer can get you through this recipe without a hitch.
Preparation Method
- Preheat your oven to 325°F (163°C). This moderate heat helps avoid cracking the cheesecake filling.
- Prepare the crust: In a medium bowl, combine graham cracker crumbs and sugar. Pour in the melted butter and stir until the mixture resembles wet sand. Press evenly into the bottom of your 9×13-inch pan using the back of a spoon or your fingers. Don’t forget to pack it firmly—it’ll hold better when baked.
- Bake the crust for 10 minutes. This gives it a slight toasty flavor and ensures it’s set before adding the filling. Remove from the oven and let it cool slightly while you prepare the cheesecake layer.
- Make the cheesecake filling: In a large bowl, beat softened cream cheese with sugar until smooth and creamy (about 2-3 minutes). Add eggs one at a time, mixing well after each addition. Stir in vanilla extract and sour cream until fully combined. Be careful not to overmix, or you risk incorporating too much air which can cause cracks.
- Pour the filling over the crust. Smooth the top with a spatula, ensuring an even layer.
- Bake for 30-35 minutes. The edges should be set but the center will still have a slight jiggle — that’s perfect! Overbaking can dry it out, so check frequently after the 30-minute mark.
- Cool completely at room temperature. Then refrigerate for at least 2 hours or overnight to let the cheesecake firm up.
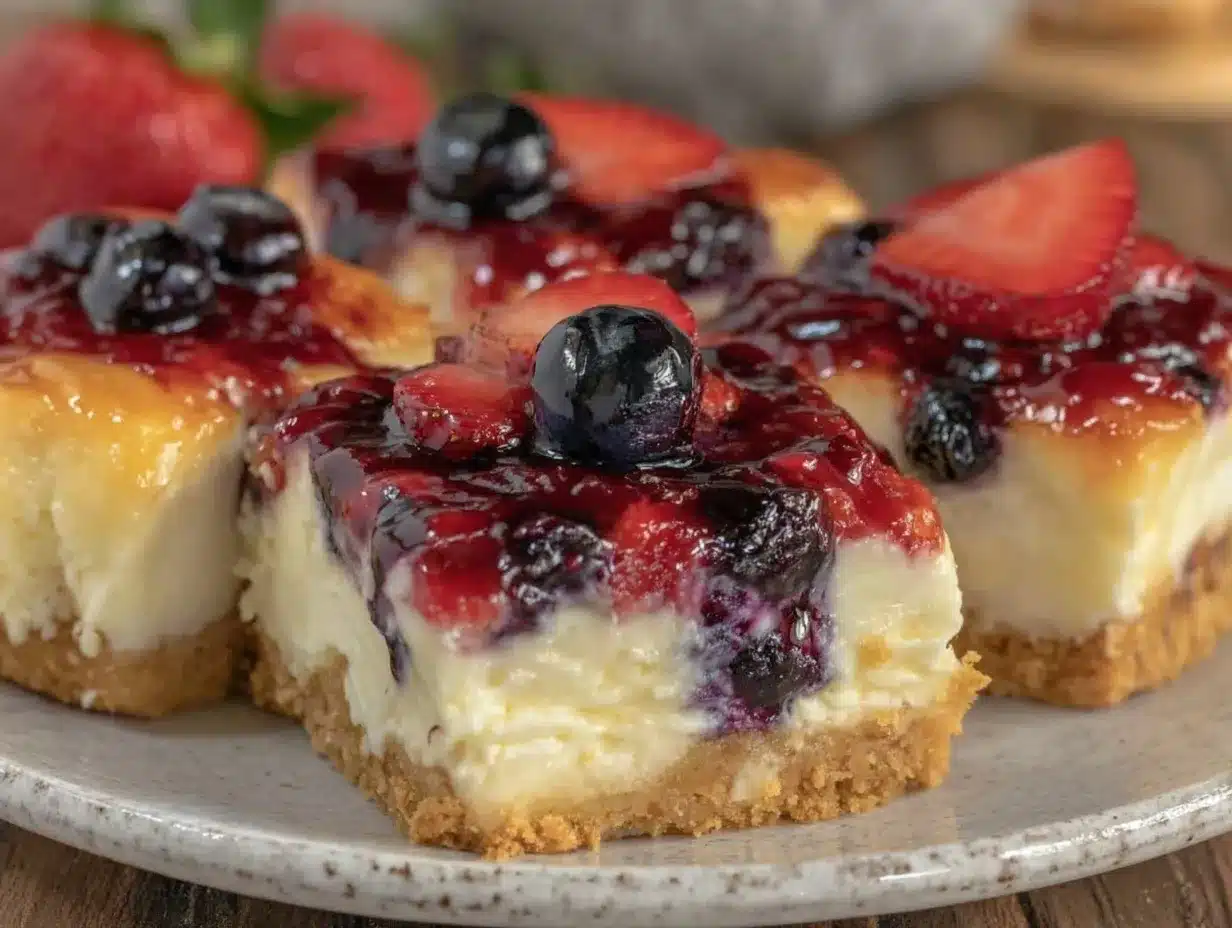
- Arrange the berries on top to create the stars and stripes: Use blueberries to form the “star” section on one corner, then line up sliced strawberries in rows to mimic stripes. This step is where the magic happens, and honestly, it’s pretty fun to get creative with the pattern.
- Optional: Dust lightly with powdered sugar for a finishing touch before serving.
- Cut into bars and serve chilled. Use a sharp knife wiped clean between cuts for neat squares.
Pro tip: If you want clean edges, dip your knife in hot water before cutting and wipe it dry each time.
Cooking Tips & Techniques
One of the trickiest parts of cheesecake bars is achieving that silky smooth filling without cracks. Here’s what I’ve learned from my kitchen experiments:
- Room temperature ingredients matter: Cream cheese and eggs should be at room temp to blend smoothly and avoid lumps.
- Don’t overmix: Mix just until combined to avoid air bubbles that cause cracks during baking.
- Baking temperature is key: Too hot and you risk cracking or drying out the cheesecake. Keeping it at 325°F (163°C) helps it set nicely.
- Watch the bake time: The cheesecake should jiggle slightly in the center when done. If it’s completely firm, it’s overbaked.
- Cool gradually: Let it cool at room temperature before chilling. Sudden temperature changes can cause cracks.
- Berry arrangement: Patience pays off here! Take your time placing the berries for a pretty presentation that wows.
I once forgot to soften my cream cheese and ended up with a lumpy mess that took forever to smooth out. Lesson learned: patience is a virtue in cheesecake making! Also, I like to multitask by prepping the berries while the crust bakes, saving time later. It’s little hacks like these that keep the whole process smooth and stress-free.
Variations & Adaptations
Want to switch things up? Here are a few ideas I’ve tried or imagined that work well with this recipe:
- Flavor twists: Add a teaspoon of lemon zest to the cheesecake filling for a bright, citrusy note that pairs beautifully with berries.
- Seasonal berries: In fall, swap strawberries and blueberries for sliced apples and cranberries with a sprinkle of cinnamon for a cozy spin.
- Gluten-free crust: Use almond flour or gluten-free graham crackers to keep it friendly for gluten-sensitive guests.
- Dairy-free option: Try a vegan cream cheese and coconut yogurt combo for a dairy-free version that still tastes rich and creamy.
- Mini bars: Make individual servings in a muffin tin lined with parchment for easy grab-and-go treats at picnics.
Personally, I once swapped out the strawberries for raspberries and added a sprinkle of chopped mint on top — it was a refreshing surprise that my guests loved! Feel free to play around with what berries are in season or what flavors you prefer most. The basic cheesecake and crust combo is super versatile.
Serving & Storage Suggestions
These cheesecake bars are best served chilled, straight from the fridge. The coolness complements the creamy texture and fresh fruit perfectly. For a festive presentation, serve them on a white platter to make the red and blue colors pop, and maybe add a few extra berries around the edges for garnish.
They pair wonderfully with a light sparkling wine or even a cold glass of lemonade for non-alcoholic option. For a casual BBQ or picnic, they’re a refreshing, sweet finish that won’t weigh you down.
Store leftover bars tightly covered in the refrigerator for up to 4 days. If you want to keep them longer, freeze wrapped bars in an airtight container for up to 2 months. To thaw, place them in the fridge overnight — avoid microwaving, as that can mess with the texture.
Over time, the flavors actually meld and the crust softens slightly, making the bars taste even more luscious the next day. So if you’re prepping ahead for a party, these bars actually benefit from some chill time.
Nutritional Information & Benefits
Each bar (assuming 12 servings) has roughly:
| Calories | 280 kcal |
|---|---|
| Fat | 18g |
| Carbohydrates | 25g |
| Protein | 5g |
The cream cheese provides a good source of calcium and protein, while the fresh berries add antioxidants and vitamins like vitamin C. Using a moderate amount of sugar keeps it balanced, and swapping sour cream for Greek yogurt can add probiotics.
This recipe is naturally gluten-free if you use gluten-free graham crackers, and you can easily make it low-carb by using almond flour crust and a sugar substitute like erythritol. Just be mindful of berry quantities, as they contain natural sugars.
From a wellness perspective, this dessert feels like a treat but doesn’t overdo it on sugar or fat, especially when portioned carefully. It’s a great way to enjoy a festive dessert without the post-party regret.
Conclusion
The Perfect Stars & Stripes Cheesecake Bars are exactly the kind of recipe that makes you want to keep coming back to the kitchen. They’re simple enough to whip up without fuss but deliver a festive, delicious treat that looks like you spent all day. I love how easily customizable they are, and honestly, the reaction from friends and family is always worth it.
Whether you’re celebrating Independence Day, Memorial Day, or just want a patriotic dessert that’s as fun to make as it is to eat, these cheesecake bars will fit right in. Don’t be afraid to experiment with the berry arrangement or try different crust options to make the recipe your own.
Try it out, and when you do, I’d love to hear how you styled your stars and stripes or any twists you made. Sharing recipes is all about community, after all. So go ahead—grab those berries and cream cheese, and make your own little slice of patriotic heaven. Happy baking!
FAQs About Perfect Stars & Stripes Cheesecake Bars
- Can I make these cheesecake bars ahead of time? Yes! They actually taste better after chilling overnight, so making them a day ahead is perfect.
- What if I don’t have fresh berries? Frozen berries can work in a pinch, but fresh berries make for a prettier and fresher-tasting topping.
- How do I prevent cracks in the cheesecake? Use room temperature ingredients, bake at 325°F (163°C), don’t overmix, and avoid overbaking. Cooling gradually also helps.
- Can I use other fruits besides strawberries and blueberries? Absolutely! Raspberries, blackberries, or even sliced kiwi can be great alternatives to create fun color patterns.
- Is it possible to make these bars gluten-free? Yes, just swap the graham cracker crumbs with gluten-free crackers or almond flour for the crust.
Pin This Recipe!
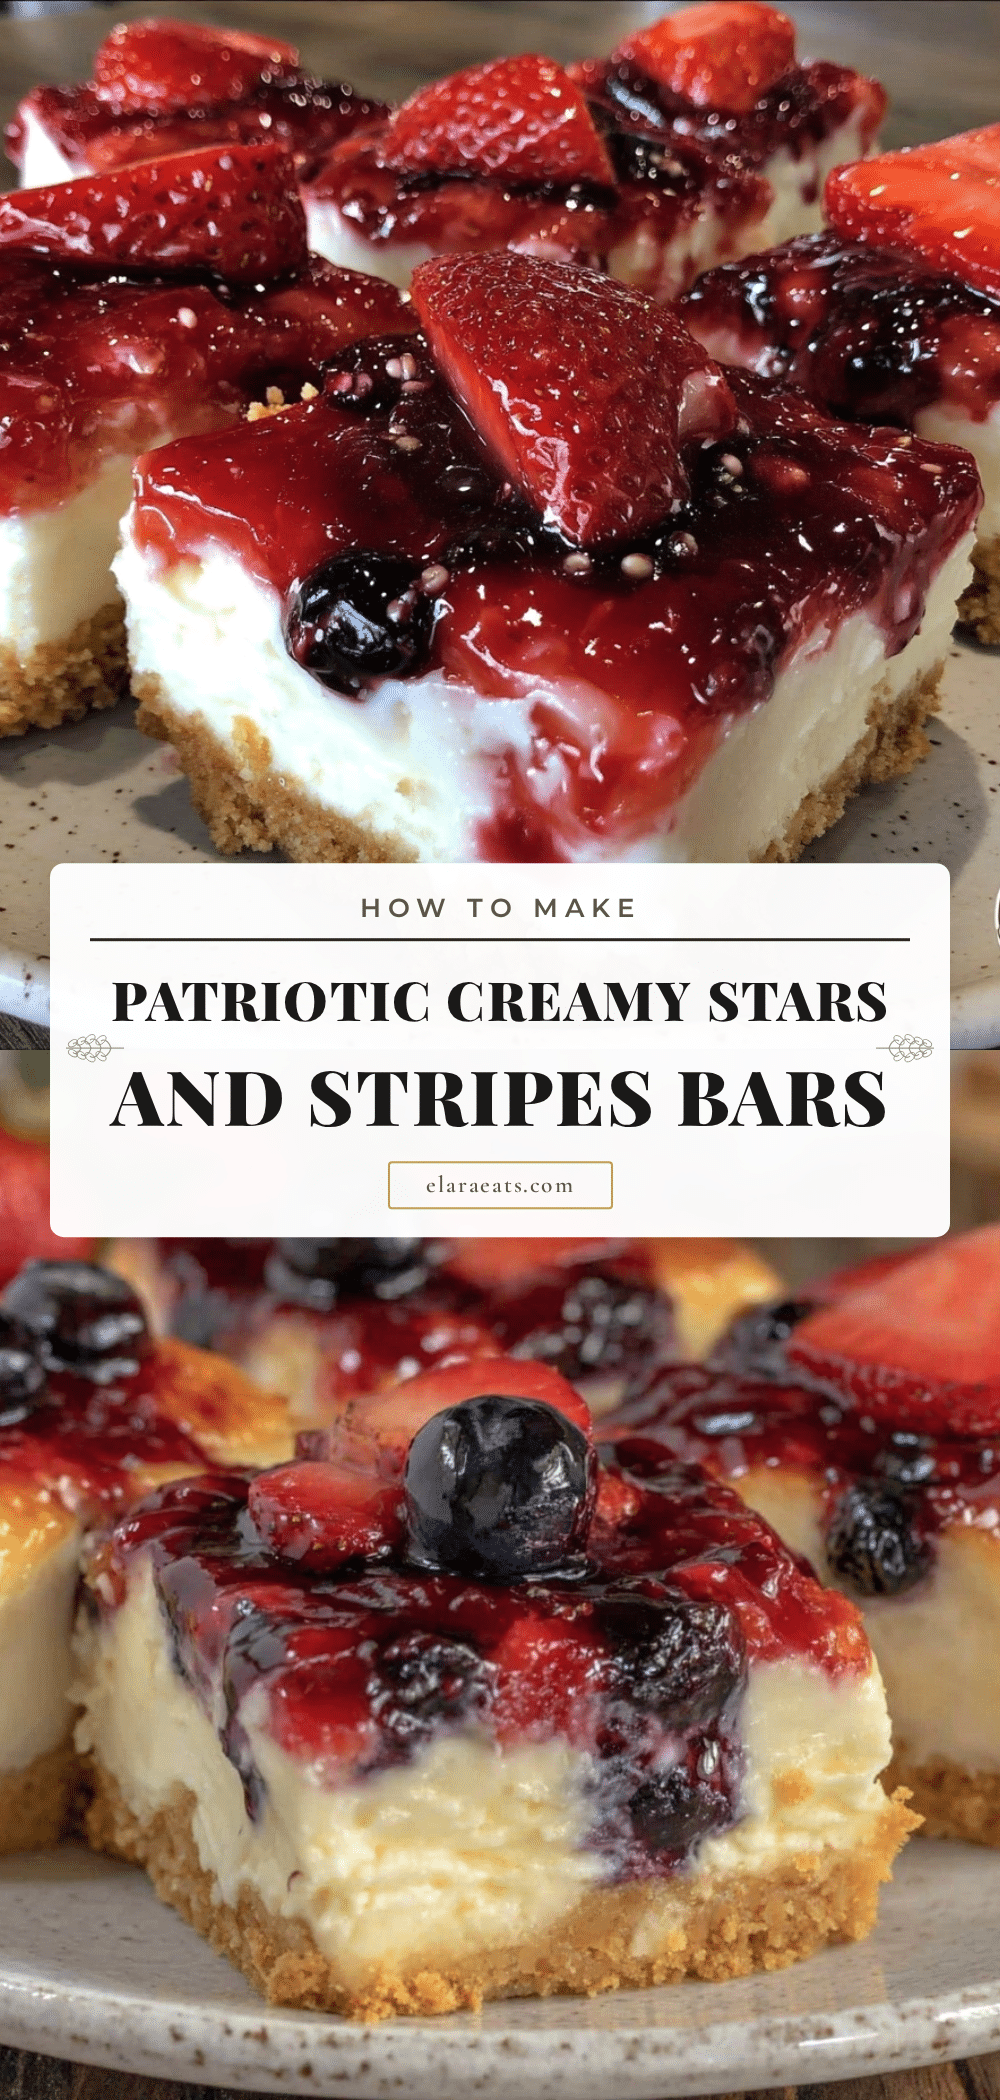
Perfect Stars & Stripes Cheesecake Bars
These easy and festive cheesecake bars feature a buttery graham cracker crust, creamy cheesecake filling, and fresh strawberries and blueberries arranged to mimic the stars and stripes, perfect for patriotic celebrations.
- Prep Time: 15 minutes
- Cook Time: 45 minutes
- Total Time: 2 hours 60 minutes
- Yield: 12 servings 1x
- Category: Dessert
- Cuisine: American
Ingredients
- 1 ½ cups graham cracker crumbs (about 12 full sheets, finely crushed)
- ⅓ cup granulated sugar
- 6 tablespoons unsalted butter, melted
- 16 oz (450g) cream cheese, softened to room temperature
- ⅔ cup granulated sugar
- 2 large eggs, room temperature
- 1 teaspoon pure vanilla extract
- 2 tablespoons sour cream
- 1 cup fresh strawberries, hulled and sliced
- 1 cup fresh blueberries
- Optional: Powdered sugar for dusting
Instructions
- Preheat your oven to 325°F (163°C).
- In a medium bowl, combine graham cracker crumbs and sugar. Pour in the melted butter and stir until the mixture resembles wet sand. Press evenly into the bottom of your 9×13-inch pan using the back of a spoon or your fingers. Pack it firmly.
- Bake the crust for 10 minutes. Remove from the oven and let it cool slightly.
- In a large bowl, beat softened cream cheese with sugar until smooth and creamy (about 2-3 minutes). Add eggs one at a time, mixing well after each addition. Stir in vanilla extract and sour cream until fully combined. Avoid overmixing.
- Pour the filling over the crust and smooth the top with a spatula.
- Bake for 30-35 minutes until edges are set but center has a slight jiggle.
- Cool completely at room temperature, then refrigerate for at least 2 hours or overnight.
- Arrange blueberries on one corner to form the ‘star’ section, then line up sliced strawberries in rows to mimic stripes.
- Optional: Dust lightly with powdered sugar before serving.
- Cut into bars and serve chilled. For clean edges, dip your knife in hot water and wipe dry between cuts.
Notes
Use room temperature ingredients to avoid lumps and cracks. Do not overmix the filling to prevent air bubbles. Bake at 325°F to avoid cracking. Cool gradually before refrigerating. For clean cutting, dip knife in hot water and wipe between cuts. Gluten-free and dairy-free substitutions are possible.
Nutrition
- Serving Size: 1 bar (1/12th of the
- Calories: 280
- Fat: 18
- Carbohydrates: 25
- Protein: 5
Keywords: cheesecake bars, patriotic dessert, Fourth of July dessert, easy cheesecake, stars and stripes dessert, berry cheesecake bars