Love this? Save it for later!
Share the inspiration with your friends
The PTA Halloween bake sale was in six hours and I’d completely forgotten. Everyone else would be bringing those elaborate themed cakes with fondant ghosts and hand-piped spiderwebs. I had a half-empty jar of peanut butter, some powdered sugar, and a toddler who was napping for maybe forty-five more minutes. Honestly, I almost just bought a bag of store-bought cookies and called it a day. But then I spotted the black cocoa powder hiding in the back of my pantry—leftover from a failed attempt at homemade Oreos last year—and an idea started forming. It wasn’t going to be fancy. It was going to be fast. And maybe, just maybe, it would look like a little black cat.
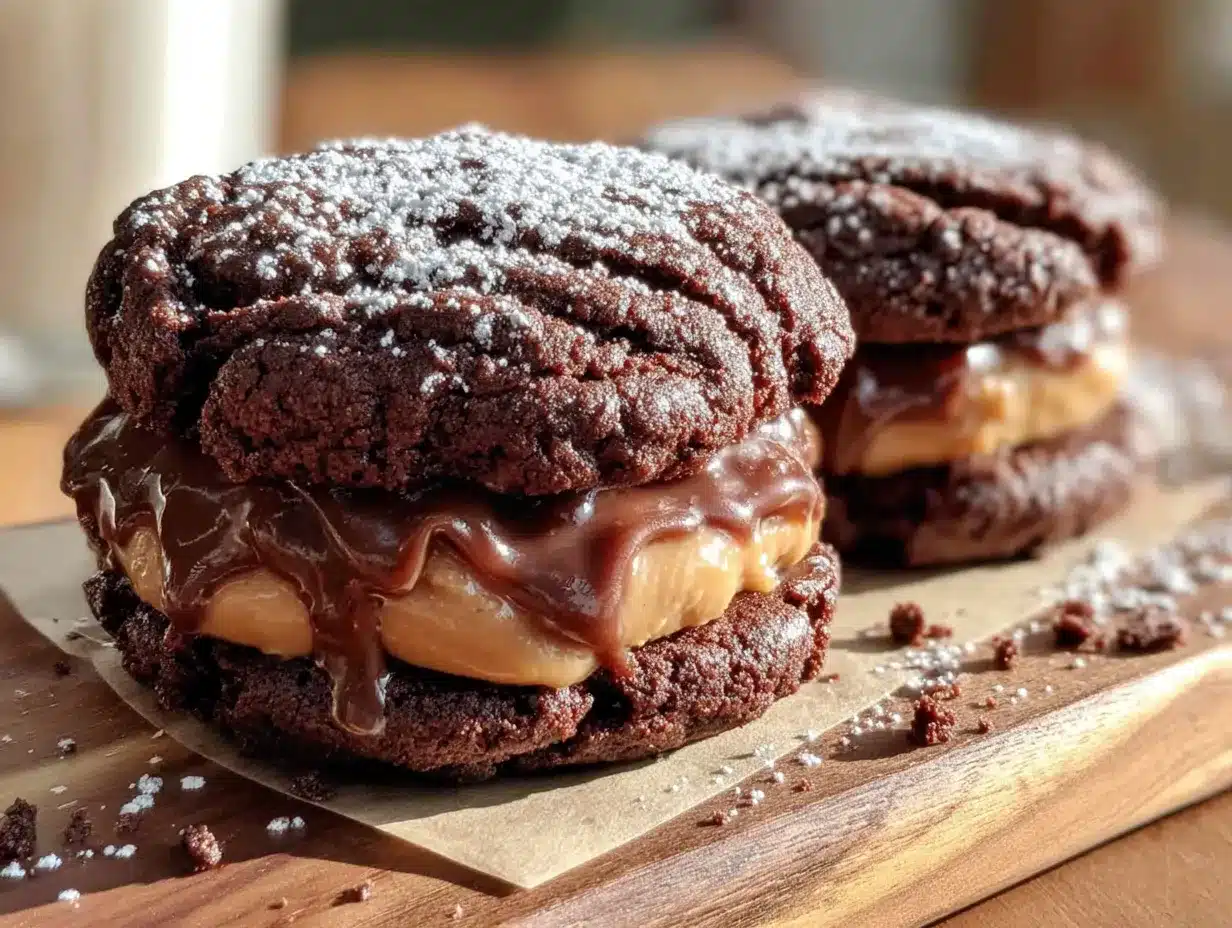
I started mixing the dough while keeping one ear out for my daughter waking up. The dough came together in one bowl—no electric mixer needed, which was a win because mine was still in the dishwasher from breakfast. I rolled them into little balls, flattened them with a fork (the classic peanut butter cookie crosshatch), and popped them in the oven. While they baked, I whipped up a simple peanut butter frosting. The whole thing took maybe twenty minutes of active time. I cut the cookies into cat faces using a paring knife—nothing fancy, just triangles for ears and a little slit for a tail shape on the top cookie. I sandwiched them together and drew whiskers and eyes with melted white chocolate. They looked ridiculous and wonderful and exactly like something a panicked mom would make at 10 AM on a Tuesday.
Here’s the thing—they sold out in the first fifteen minutes. The fancy cakes sat there. The spooky black cat peanut butter cookie sandwiches were gone. A little girl grabbed two and her mom came back for the recipe. I stood there feeling sheepish and proud all at once. That’s how this recipe became our Halloween tradition. It’s the one you make when you have no time, no energy, and somehow still want to show up with something that feels special. Maybe you’ve been there too—staring at your pantry at the last minute, wondering how everyone else makes it look so easy. These cookies are your answer. They’re simple, they’re spooky, and they taste like childhood.
Why You’ll Love This Recipe
Let me tell you why these spooky black cat peanut butter cookie sandwiches have become my go-to for every Halloween party, school event, and last-minute gathering. I’ve tested this recipe about seven times now—yes, seven—to get the texture just right. The cookies need to be sturdy enough to hold the filling but soft enough that they don’t crumble when you bite into them. I finally nailed it by chilling the dough for just ten minutes before baking. That little trick changed everything.
- Quick & Easy: From start to finish, these come together in under 45 minutes. Most of that is baking time. You’re only actively working for about 20 minutes.
- Simple Ingredients: You probably have everything already. Peanut butter, sugar, an egg, flour, baking soda, and black cocoa powder. The frosting is just peanut butter, butter, and powdered sugar.
- Perfect for Halloween: They look adorable on a platter, they travel well, and kids absolutely lose their minds over them. I’ve brought them to three different Halloween parties and they always disappear first.
- Crowd-Pleaser: I’ve had adults tell me they’re “dangerously good” and kids ask for the recipe to give to their parents. The peanut butter flavor is front and center, and the black cocoa gives them that deep, dark color without being bitter.
- Unbelievably Delicious: The texture is next-level comfort food. Crispy edges, soft centers, and that creamy peanut butter filling in the middle. It’s like a Reese’s peanut butter cup met an Oreo and they decided to become a Halloween cookie.
What makes this recipe different from all the other peanut butter cookie recipes out there? It’s the black cocoa powder. Regular cocoa powder won’t give you that dark, spooky color. Black cocoa is what makes Oreos taste like Oreos—it’s darker, less acidic, and has this almost smoky, deep chocolate flavor. Combined with peanut butter, it creates a flavor profile that’s nostalgic but also a little unexpected. I’ve had people take a bite and say, “Wait, what IS that?” in the best way possible.
This recipe isn’t just good—it’s the kind that makes you close your eyes after the first bite. It’s comfort food reimagined for Halloween. It’s the cookie you make when you want to impress your kid’s classmates but you also want to eat three of them while standing over the kitchen counter at midnight.
What Ingredients You Will Need
This recipe uses simple, wholesome ingredients that come together to create something truly special. The magic happens when the peanut butter meets the black cocoa powder—they balance each other perfectly. Here’s what you’ll need:
For the Cookies
- 1 cup creamy peanut butter (I use Skippy natural—it has the right consistency and doesn’t separate too much. Avoid the natural ones that are super oily; they make the cookies spread too thin.)
- 1 cup granulated sugar (plus extra for rolling—this gives the cookies that sparkly, crackly top)
- 1 large egg (room temperature is best, but I’ve used it straight from the fridge in a pinch and it still works)
- 1 teaspoon vanilla extract (pure vanilla extract, not imitation—you can taste the difference here)
- 1 cup all-purpose flour (spoon and level it—don’t scoop directly from the bag or you’ll get too much)
- 1 teaspoon baking soda (make sure it’s fresh—test it by dropping a little in vinegar; it should fizz)
- 1/4 cup black cocoa powder (this is non-negotiable for the spooky color. Regular cocoa powder will give you a brown cookie, not a black one. I buy King Arthur Flour Black Cocoa or Rodelle Gourmet Black Cocoa online—both are excellent)
- 1/4 teaspoon salt (if your peanut butter is salted, you can skip this, but I like the balance it provides)
For the Peanut Butter Filling
- 1/2 cup creamy peanut butter (same brand as the cookies—consistency matters)
- 2 tablespoons unsalted butter (softened to room temperature—don’t microwave it or the filling will be greasy)
- 1 cup powdered sugar (sift it if it’s lumpy—nobody wants crunchy frosting)
- 2-3 tablespoons milk (start with 2 and add more if needed. Whole milk gives the creamiest texture, but any milk works)
- 1/2 teaspoon vanilla extract
For Decoration
- 1/4 cup white chocolate chips or melting wafers (melted—for the eyes and whiskers)
- 1/2 teaspoon coconut oil or vegetable shortening (to thin the white chocolate so it pipes smoothly)
- Optional: black sanding sugar or edible glitter (for extra sparkle—I skip this for school events but add it for parties)
A few ingredient tips I’ve learned the hard way: Don’t use natural peanut butter that’s been sitting in the fridge and has hardened. It won’t cream properly with the sugar and your cookies will be dry and crumbly. Also, the black cocoa powder can be a little tricky to find—I’ve seen it at specialty baking stores and on Amazon. If you absolutely can’t find it, you can use Dutch-process cocoa powder, but the cookies will be a dark brown, not black. They’ll still taste amazing, but they won’t have that spooky Halloween look.
For the white chocolate, I prefer Ghirardelli melting wafers because they melt smoothly and don’t seize up. But regular white chocolate chips work fine if you add a little coconut oil to thin them out. Trust me on this—I learned the hard way when my first batch of white chocolate turned into a grainy mess.
Equipment Needed
You don’t need much for these spooky black cat peanut butter cookie sandwiches, and that’s part of the beauty. Here’s what you’ll need:
- Large mixing bowl (any size works, but bigger is better for mixing without making a mess)
- Hand mixer or stand mixer (optional but helpful for the filling—I’ve mixed the cookie dough by hand with a wooden spoon and it works fine)
- Baking sheet (I use a light-colored aluminum sheet—dark sheets can cause the bottoms to burn)
- Parchment paper or silicone baking mat (parchment paper is cheaper and works great for easy cleanup)
- Fork (for making the classic crisscross pattern on top of the cookies)
- Paring knife or small cookie cutter (for shaping the cat ears—I use a paring knife because it’s what I have, but a small round cutter works too)
- Piping bag or small zip-top bag (for the white chocolate decoration—a zip-top bag with a tiny corner snipped off works perfectly)
- Cooling rack (essential for letting the cookies cool completely—if you sandwich them while warm, the filling will melt and slide out)
I’ve made these cookies in a friend’s kitchen with a hand-me-down baking sheet that was warped and dark—they still turned out great, just keep an eye on the baking time. If you don’t have a cooling rack, you can use the wire rack from your toaster oven or even just a clean dish towel. I’ve done it in a pinch. The cookies just need to be completely cool before you assemble them.
Preparation Method
Alright, let’s make these spooky black cat peanut butter cookie sandwiches. I’ve broken this down into steps that even a sleep-deprived parent can follow. Trust me—I’ve done it.
- Preheat your oven to 350°F (175°C). Line two baking sheets with parchment paper. I always do this first so I don’t forget and have to wait for the oven to heat up while the dough sits.
- Make the cookie dough: In a large bowl, combine 1 cup creamy peanut butter and 1 cup granulated sugar. Mix until smooth—it’ll look a little crumbly at first, but keep going. Add 1 large egg and 1 teaspoon vanilla extract. Mix until everything comes together into a cohesive dough. It should be soft but not sticky.
- Add the dry ingredients: In a separate small bowl, whisk together 1 cup all-purpose flour, 1 teaspoon baking soda, 1/4 cup black cocoa powder, and 1/4 teaspoon salt. Add this to the wet mixture and stir until just combined. Don’t overmix—that’s how you get tough cookies. The dough will be thick and slightly darker than you expect. That’s the black cocoa doing its job.
- Chill the dough: This step is crucial. Cover the bowl with plastic wrap and pop it in the fridge for 10 minutes. I know it’s tempting to skip this, but trust me—chilled dough spreads less and gives you thicker, softer cookies. While it chills, wash your hands and set up your workspace.
- Shape the cookies: Scoop out about 1.5 tablespoons of dough (I use a small cookie scoop for consistency) and roll it into a ball. Roll the ball in granulated sugar—this gives the cookies that sparkly, crackly top. Place the balls on the prepared baking sheets, about 2 inches apart. They don’t spread much, so you can fit 12 per sheet.
- Flatten and shape: Using a fork, flatten each ball in a crisscross pattern. This is the classic peanut butter cookie look. Now, for the cat ears: Using a paring knife, gently pinch and shape the top of each cookie into two small triangles. It doesn’t have to be perfect—cats have imperfect ears too. I’ve found that shaping them while the dough is still cold from the fridge makes it much easier.
- Bake: Bake for 10-12 minutes. The cookies should look puffed and slightly cracked on top. They’ll be soft when you take them out—don’t overbake! They continue to set as they cool. Let them cool on the baking sheet for 5 minutes, then transfer to a cooling rack to cool completely. This is important: they need to be completely cool before you add the filling.
- Make the filling: While the cookies cool, make the peanut butter filling. In a medium bowl, beat together 1/2 cup peanut butter and 2 tablespoons softened butter until smooth and creamy. Add 1 cup powdered sugar, 1/2 teaspoon vanilla extract, and 2 tablespoons milk. Beat until smooth. If it’s too thick, add another tablespoon of milk. If it’s too thin, add a little more powdered sugar. The consistency should be spreadable but not runny—like a thick frosting.
- Assemble the sandwiches: Pair up the cookies by size. Spread about 1 tablespoon of filling on the flat side of one cookie, then top with another cookie, flat side down. Press gently—not too hard or the filling squishes out the sides. I’ve done this and ended up with filling all over my fingers. Still delicious, but messy.
- Decorate: Melt the white chocolate chips with 1/2 teaspoon coconut oil in the microwave in 15-second intervals, stirring between each, until smooth. Transfer to a small piping bag or zip-top bag with a tiny corner snipped off. Pipe two small dots for eyes, then three whiskers on each side of the face. Let the chocolate set for about 10 minutes before serving.
One thing I learned the hard way: don’t try to rush the cooling process by putting the cookies in the fridge while they’re still warm. The condensation will make the cookies soggy. Just be patient. Use that time to clean up your kitchen or pour yourself a coffee. You’ve earned it.
Cooking Tips & Techniques
After making these spooky black cat peanut butter cookie sandwiches about a dozen times (not an exaggeration—my family is tired of them, but I’m not), I’ve picked up a few tricks that make the process smoother and the results better.
Don’t skip the chill. I know I said this already, but I’m saying it again because it matters that much. The first time I made these, I was in a hurry and skipped the chilling step. The cookies spread into flat, sad discs that looked nothing like cats. They still tasted good, but they were ugly. Ten minutes in the fridge makes all the difference.
Use a cookie scoop for consistent sizing. I bought a set of three scoops from a kitchen supply store for like eight bucks, and they’ve been a game-changer. When the cookies are all the same size, they bake evenly and they pair up perfectly for sandwiches. If you don’t have a scoop, use a measuring tablespoon and level it off.
Watch the baking time like a hawk. These cookies go from perfect to overdone in about 60 seconds. I set a timer for 10 minutes and check them. They should look puffed and slightly cracked, with the edges just starting to look set. If you press gently on the top, it should spring back slightly. If it leaves a dent, give them another minute. Every oven is different—my friend’s oven runs hot and hers are done in 9 minutes.
Let the white chocolate set completely. I once got impatient and stacked the decorated cookies in a container before the white chocolate was fully set. The next morning, the whiskers had smeared into each other and the cookies looked like they’d been in a fight. Now I let them sit out for a full 15 minutes, or I pop them in the fridge for 5 minutes if I’m in a rush.
Double the batch if you’re bringing them anywhere. These disappear fast. I made a single batch for my daughter’s classroom and the teacher asked me to bring more for the staff room. Now I always make at least 24 sandwiches (which means 48 cookies). Trust me on this one.
Variations & Adaptations
One of the best things about this recipe is how flexible it is. I’ve tried several variations over the years, and here are my favorites:
Gluten-Free Version: Substitute the all-purpose flour with a 1:1 gluten-free baking flour blend. I’ve used Bob’s Red Mill and King Arthur Flour’s gluten-free blends with great success. Add an extra tablespoon of peanut butter to help with moisture, since gluten-free flours tend to be drier. The texture will be slightly more crumbly, but still delicious.
Vegan Option: Replace the egg with a flax egg (1 tablespoon ground flaxseed mixed with 3 tablespoons water, let sit for 5 minutes). Use vegan butter or coconut oil in the filling, and plant-based milk. The cookies will be a little less tender, but the flavor is still spot-on. I made these for a vegan friend’s Halloween party and she was thrilled.
Chocolate Filling Variation: For a double-chocolate experience, add 2 tablespoons of black cocoa powder to the filling mixture. It turns the filling dark too, which looks incredible. You’ll need an extra tablespoon of milk to keep it creamy. My kids actually prefer this version now.
Spiderweb Decoration: Instead of cat faces, pipe white chocolate in a spiral on top of each cookie, then drag a toothpick from the center outward to create a spiderweb pattern. I did this for a Halloween party and it looked amazing—plus it’s easier than piping individual cat features.
Mini Version: Use a teaspoon-sized scoop to make mini cookies. Bake for 6-8 minutes instead of 10-12. These are perfect for party platters or for kids who want a smaller treat. I made these for a preschool Halloween party and they were a hit—no one felt guilty about eating three.
Serving & Storage Suggestions
These spooky black cat peanut butter cookie sandwiches are best served at room temperature. The filling softens slightly as it sits, creating that perfect creamy texture that contrasts with the slightly crisp cookie. I like to arrange them on a black or orange platter for maximum Halloween effect. A few candy corn scattered around never hurts either.
For drinks, these pair beautifully with a cold glass of milk—obviously. But I’ve also served them with hot apple cider at a fall gathering and it was a surprisingly good combination. The warmth of the cider and the richness of the cookies just work. For adults, a cold glass of bourbon or a dark stout beer complements the peanut butter and black cocoa flavors perfectly.
Storage: Store assembled sandwiches in an airtight container at room temperature for up to 4 days. I’ve kept them for 5 days and they were still good, but the cookies start to soften from the filling after day 3. If you want them to stay crispier, store the cookies and filling separately and assemble just before serving.
Freezer Instructions: You can freeze the unfilled cookies for up to 3 months. Just bake them, let them cool completely, and layer them in a freezer-safe container with parchment paper between layers. When you’re ready to serve, thaw them at room temperature, make the filling, and assemble. I’ve done this for holiday prep and it works like a charm. The filled sandwiches don’t freeze as well—the filling can get grainy when thawed.
Reheating: If you somehow have leftovers (unlikely, but possible), pop them in the microwave for 8-10 seconds. It softens the filling and makes the cookie slightly warm. It’s a completely different experience from room temperature, and honestly, I might like it better. Don’t tell anyone I said that.
One more thing: the flavors actually develop over time. Day-old cookies taste even better than fresh ones—the black cocoa flavor deepens and the peanut butter becomes more pronounced. So if you’re making these for a party, bake them a day ahead. Your future self will thank you.
Nutritional Information & Benefits
Let’s be real—these are cookies. They’re a treat. But I do appreciate knowing what I’m eating, and I think you do too. Here’s the estimated nutritional breakdown per sandwich (based on 12 sandwiches from the recipe):
| Nutrient | Amount per Sandwich |
|---|---|
| Calories | 295 |
| Total Fat | 16g |
| Saturated Fat | 5g |
| Cholesterol | 18mg |
| Sodium | 210mg |
| Total Carbohydrates | 34g |
| Dietary Fiber | 2g |
| Sugars | 22g |
| Protein | 8g |
The peanut butter in these cookies provides a decent amount of protein and healthy fats. Peanut butter is also a good source of vitamin E, magnesium, and potassium. The black cocoa powder contains antioxidants—more than regular cocoa, actually, because of how it’s processed. So there are some redeeming qualities here. It’s not health food, but it’s not empty calories either.
For dietary considerations: This recipe contains peanuts, dairy, and gluten. It can be made gluten-free and vegan with the substitutions I mentioned earlier. It’s not low-carb or sugar-free, but honestly, Halloween is not the time for that. Enjoy the cookie. Life is short.
Conclusion
These spooky black cat peanut butter cookie sandwiches have become my Halloween signature, and I think they deserve to be yours too. They’re the recipe you turn to when you want to show up with something impressive but you have approximately zero energy left. They’re the cookie that proves simple ingredients, made with a little love and a lot of peanut butter, can outshine the most elaborate Pinterest creations every single time.
I love this recipe because it reminds me that perfection is overrated. Those first cookies I made—the ones with the slightly lopsided ears and the messy whiskers—were the ones that sold out. People didn’t care that they weren’t perfect. They cared that they tasted amazing and that they were made with love. That’s what Halloween is about, right? Showing up, sharing something sweet, and not taking yourself too seriously.
So go ahead—make these for your kid’s classroom, your office party, or just for yourself on a quiet October evening. Customize them, mess them up, make them your own. And when someone asks for the recipe (they will), send them my way. I’d love to hear how yours turned out. Drop a comment below or tag me in your photos—I live for that stuff. Happy Halloween, friend. Now go make some cookies.
Frequently Asked Questions
Can I use natural peanut butter for this recipe?
You can, but I don’t recommend it. Natural peanut butter that separates tends to be oilier and less stable, which can cause the cookies to spread too much and become greasy. If that’s all you have, stir it really well and consider adding an extra tablespoon of flour to compensate.
How do I get the cookies to be really black?
The key is black cocoa powder. Regular cocoa powder or Dutch-process cocoa will give you a dark brown cookie, not a true black one. Black cocoa powder is available at specialty baking stores or online. I’ve also found it at some well-stocked grocery stores in the baking aisle.
Can I make these cookies ahead of time?
Absolutely. You can bake the cookies up to 3 days ahead and store them in an airtight container. Make the filling and assemble them the day you plan to serve them for the best texture. Or freeze the unfilled cookies for up to 3 months.
How do I pipe the white chocolate decorations without making a mess?
Use a small zip-top bag with a tiny corner snipped off. Practice on a piece of parchment paper first to get the hang of it. If the white chocolate is too thick, add a tiny bit of coconut oil or vegetable shortening to thin it out. And let the chocolate set completely before stacking or storing the cookies.
Can I double this recipe?
Yes, and I actually recommend it. This recipe doubles beautifully. Just make sure you have enough baking sheets and space in your oven. You may need to bake in batches, and that’s fine. The dough can sit at room temperature for about 30 minutes while you bake the first batch.
Pin This Recipe!

Spooky Black Cat Peanut Butter Cookie Sandwiches: Easy Halloween Treat

These spooky black cat peanut butter cookie sandwiches are quick, easy, and perfect for Halloween. Made with black cocoa powder and a creamy peanut butter filling, they’re a crowd-pleaser that comes together in under 45 minutes.
- Prep Time: 20 minutes
- Cook Time: 12 minutes
- Total Time: 45 minutes
- Yield: 12 sandwiches 1x
- Category: Dessert
- Cuisine: American
Ingredients
- 1 cup creamy peanut butter
- 1 cup granulated sugar (plus extra for rolling)
- 1 large egg (room temperature)
- 1 teaspoon vanilla extract
- 1 cup all-purpose flour (spooned and leveled)
- 1 teaspoon baking soda
- 1/4 cup black cocoa powder
- 1/4 teaspoon salt
- 1/2 cup creamy peanut butter (for filling)
- 2 tablespoons unsalted butter (softened)
- 1 cup powdered sugar (sifted if lumpy)
- 2–3 tablespoons milk
- 1/2 teaspoon vanilla extract
- 1/4 cup white chocolate chips or melting wafers
- 1/2 teaspoon coconut oil or vegetable shortening
- Optional: black sanding sugar or edible glitter
Instructions
- Preheat oven to 350°F (175°C). Line two baking sheets with parchment paper.
- In a large bowl, combine 1 cup creamy peanut butter and 1 cup granulated sugar. Mix until smooth. Add 1 large egg and 1 teaspoon vanilla extract; mix until cohesive.
- In a separate small bowl, whisk together 1 cup all-purpose flour, 1 teaspoon baking soda, 1/4 cup black cocoa powder, and 1/4 teaspoon salt. Add to wet mixture and stir until just combined. Do not overmix.
- Cover bowl with plastic wrap and chill dough in the refrigerator for 10 minutes.
- Scoop about 1.5 tablespoons of dough and roll into a ball. Roll in granulated sugar. Place on prepared baking sheets, 2 inches apart.
- Using a fork, flatten each ball in a crisscross pattern. Use a paring knife to shape the top of each cookie into two small triangles for cat ears.
- Bake for 10-12 minutes, until puffed and slightly cracked. Cool on baking sheet for 5 minutes, then transfer to a cooling rack to cool completely.
- While cookies cool, make filling: In a medium bowl, beat together 1/2 cup peanut butter and 2 tablespoons softened butter until smooth. Add 1 cup powdered sugar, 1/2 teaspoon vanilla extract, and 2 tablespoons milk. Beat until smooth. Add more milk if too thick, more powdered sugar if too thin.
- Pair cookies by size. Spread about 1 tablespoon of filling on the flat side of one cookie, then top with another cookie, flat side down. Press gently.
- Melt white chocolate chips with 1/2 teaspoon coconut oil in the microwave in 15-second intervals, stirring between each, until smooth. Transfer to a piping bag or zip-top bag with a tiny corner snipped off. Pipe two dots for eyes and three whiskers on each side. Let set for about 10 minutes before serving.
Notes
Chill the dough for 10 minutes to prevent spreading. Use black cocoa powder for the spooky black color. Let cookies cool completely before assembling to prevent filling from melting. White chocolate decorations should set fully before stacking.
Nutrition
- Serving Size: 1 sandwich
- Calories: 295
- Sugar: 22
- Sodium: 210
- Fat: 16
- Saturated Fat: 5
- Carbohydrates: 34
- Fiber: 2
- Protein: 8
Keywords: Halloween cookies, peanut butter cookies, black cat cookies, sandwich cookies, easy Halloween treat


