Love this? Save it for later!
Share the inspiration with your friends
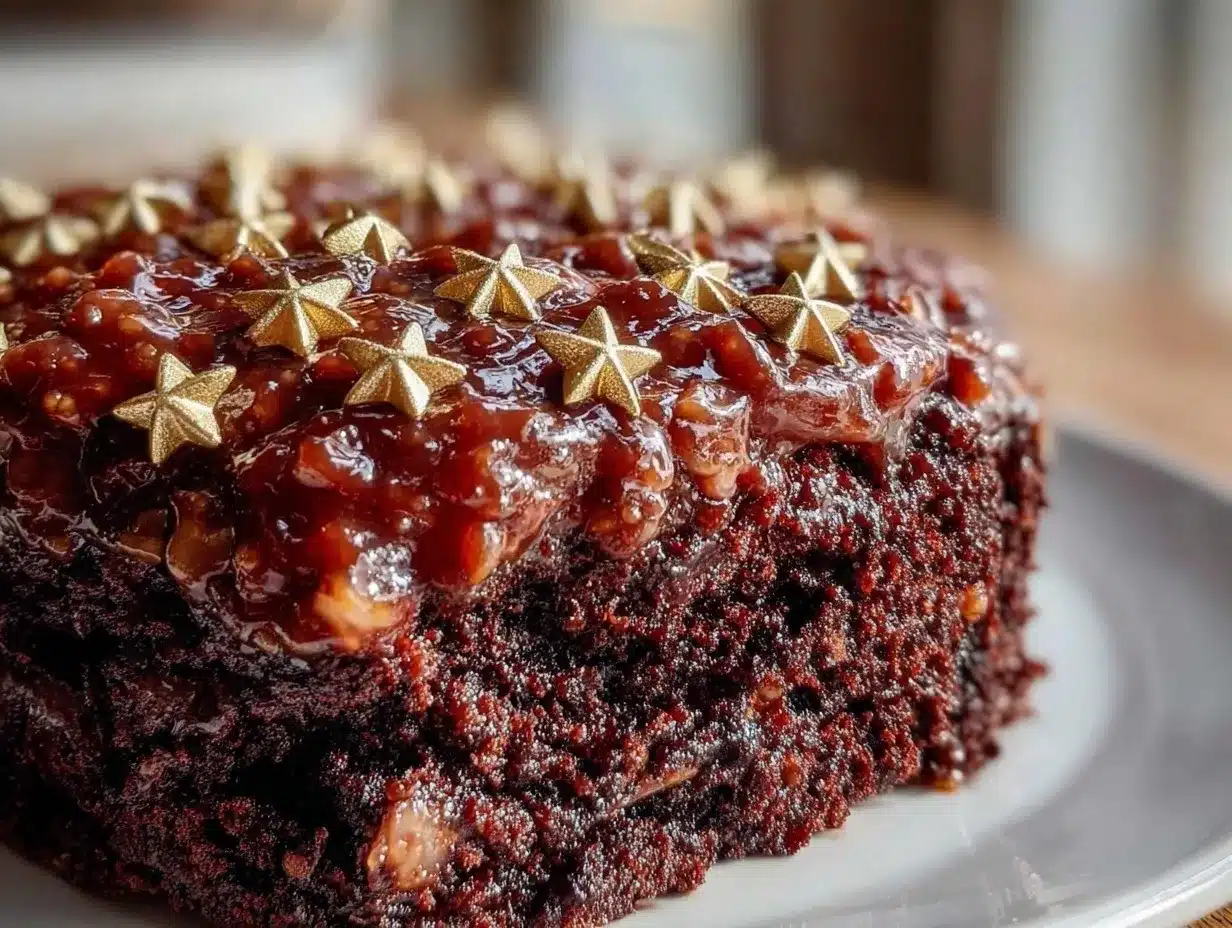
“I never thought astrology and baking would collide in my kitchen, but here we are,” I said half-laughing to my friend as I fumbled with gold edible stars one evening. It all started on a quiet Sunday when I was scrolling through my favorite stargazing app, and suddenly the idea hit me: why not create a cake that celebrates the Taurus zodiac sign with a rich, indulgent twist? The result was the Perfect Taurus Black Velvet Chocolate Cake with Gold Stars—a dessert that’s as bold and grounded as the Taurus spirit itself.
Honestly, this recipe wasn’t planned. I was aiming for a classic black velvet cake, something darker and smoother than your typical red velvet, but with a secret, silky crumb that makes each bite melt in your mouth. The gold stars? A last-minute inspiration after a quick trip to the corner store, where I accidentally grabbed edible gold leaf sheets instead of the usual sprinkles. That little mix-up turned out to be pure magic, adding a celestial sparkle that felt just right for a Taurus-themed celebration.
Maybe you’ve been there—scrambling to whip up something special for a birthday or a zodiac party, and suddenly a simple kitchen experiment becomes your signature dish. This cake stuck with me because it’s not just chocolatey goodness; it’s a conversation starter, a showstopper, and honestly, a mood lifter. You know that feeling when a dessert makes you pause and savor the moment? That’s exactly what this cake does. So, let me tell you all about how to make this starry, velvety delight that’s perfect for anyone who loves a bit of cosmic charm with their chocolate.
Why You’ll Love This Recipe
After countless trials and a few messy kitchen moments (I’m looking at you, gold leaf sticking everywhere), this Perfect Taurus Black Velvet Chocolate Cake with Gold Stars became my go-to for celebrations that need that extra touch of wow. I mean, who doesn’t want a cake that’s both stunning and seriously delicious? Here’s why this recipe stands out:
- Quick & Easy: Ready in under 1 hour, making it perfect for last-minute birthday plans or zodiac gatherings.
- Simple Ingredients: Most of the ingredients are pantry staples—you probably already have them hanging out in your kitchen.
- Perfect for Astrological Celebrations: Tailored for Taurus birthdays or anyone who appreciates the grounded, luxurious vibe of this zodiac sign.
- Crowd-Pleaser: Kids, adults, skeptics of black velvet—everyone’s asking for seconds.
- Unbelievably Delicious: The deep chocolate flavor combined with a velvety texture is pure comfort food with a hint of elegance.
What really sets this cake apart is the texture—oh, the texture! It’s smoother than your ordinary chocolate cake, thanks to a special blend of cocoa powder and a touch of buttermilk. And those gold stars? They’re not just decoration—they bring a festive sparkle that makes the whole cake feel like a night sky celebration. This isn’t just another chocolate cake; it’s a little indulgence wrapped in cosmic charm. You’ll want to make it again and again, whether for a Taurus friend or just because you deserve a slice of the stars.
What Ingredients You Will Need
This recipe calls for simple, wholesome ingredients that come together to create that deep black velvet color and luscious chocolate taste. You can find everything at your local grocery store, and I’ve included a couple of substitution tips if you’re looking to tweak it.
- For the Cake Batter:
- All-purpose flour – 2 cups (240 g), sifted
- Unsweetened cocoa powder – ¾ cup (75 g), preferably Dutch-processed for best color and flavor
- Baking soda – 1 ½ teaspoons
- Salt – 1 teaspoon
- Unsalted butter – ½ cup (115 g), softened (I swear by Kerrygold for richness)
- Granulated sugar – 1 ¾ cups (350 g)
- Large eggs – 3, room temperature
- Buttermilk – 1 cup (240 ml), room temperature (if you don’t have buttermilk, mix 1 cup milk with 1 tablespoon lemon juice and let it sit for 5 minutes)
- Vanilla extract – 2 teaspoons
- Black food coloring gel – 1 tablespoon (optional, but it intensifies that black velvet look)
- For the Frosting:
- Cream cheese – 8 oz (225 g), softened
- Unsalted butter – ½ cup (115 g), softened
- Powdered sugar – 3 cups (360 g), sifted
- Vanilla extract – 1 teaspoon
- Heavy cream – 2 tablespoons (30 ml), to adjust consistency
- For Decoration:
- Edible gold stars or gold leaf sheets – about 20-25 pieces (found at specialty baking or online stores)
- Optional: edible glitter for extra sparkle
Pro tip: When choosing your cocoa powder, I always go for a high-quality Dutch-processed one, like Valrhona or Ghirardelli, to get that deep color and smooth flavor. And don’t skip the buttermilk—it really makes the crumb tender and moist.
Equipment Needed
- Two 8-inch (20 cm) round cake pans – non-stick or lined with parchment paper
- Mixing bowls – at least two, medium and large
- Electric mixer or stand mixer – for easy and thorough mixing
- Measuring cups and spoons – to get accurate ingredient amounts
- Rubber spatula – perfect for scraping the bowl clean
- Cooling racks – to cool the cakes evenly and prevent sogginess
- Offset spatula or butter knife – for smooth frosting application
- Small paintbrush (optional) – to gently apply gold leaf pieces without tearing
If you don’t have cake pans handy, you can use a 9×13-inch (23×33 cm) pan and adjust the baking time slightly. For frosting, a handheld electric mixer works just fine if you don’t own a stand mixer. And trust me, I once used a dinner knife to spread frosting in a pinch—it’s all about creativity when the gold stars are calling!
Preparation Method
- Preheat the oven to 350°F (175°C). Grease your two 8-inch cake pans and line the bottoms with parchment paper for easy removal. This step is crucial to prevent sticking.
- Mix dry ingredients: In a medium bowl, sift together the flour, cocoa powder, baking soda, and salt. Set aside. The sifting helps avoid lumps and ensures even mixing later.
- Cream butter and sugar: In a large bowl, beat the softened butter and granulated sugar with an electric mixer on medium speed until light and fluffy—about 3-4 minutes. This creates air pockets for a lighter cake texture.
- Add eggs: Crack in the eggs one at a time, beating well after each addition. Add the vanilla extract and black food coloring gel (if using) and mix until combined.
- Alternate adding dry ingredients and buttermilk: With the mixer on low speed, add the dry ingredients in three parts, alternating with the buttermilk in two parts. Start and end with the dry ingredients. Mix just until combined—overmixing can make the cake dense.
- Divide and bake: Evenly pour the batter into your prepared pans, smoothing the tops with a spatula. Bake for 30-35 minutes or until a toothpick inserted in the center comes out clean. Ovens vary, so start checking at 30 minutes.
- Cool completely: Let the cakes cool in the pans for 10 minutes before transferring to wire racks. Cooling fully is key to avoid melting your frosting.
- Prepare the frosting: Beat the cream cheese and butter together until smooth. Gradually add powdered sugar, mixing on low speed to prevent a sugar cloud. Add vanilla and heavy cream, then beat on medium-high until fluffy and spreadable.
- Assemble the cake: Place one cake layer on a serving plate. Spread a thick layer of frosting on top, then carefully place the second layer. Frost the top and sides smoothly with the remaining frosting.
- Apply gold stars: Using clean fingers or a small brush, carefully place edible gold stars on the frosting, creating a scattered starry night effect. If using gold leaf sheets, gently press small pieces onto the frosting for a more dramatic shine.
Insider tip: If your frosting feels too soft, chill it for 15 minutes before decorating to get a firmer finish. And if you accidentally smudge your stars, gently lift and reposition them with a toothpick.
Cooking Tips & Techniques
Getting that perfect black velvet texture and luscious chocolate flavor isn’t rocket science, but it does require a couple of kitchen tricks I’ve learned the hard way.
- Don’t skip sifting: It makes a huge difference in avoiding lumps, especially with cocoa powder.
- Use room temperature ingredients: Eggs and butter that are too cold won’t blend well, leading to uneven texture.
- Beat butter and sugar properly: This step traps air, making the cake lighter and fluffier.
- Alternate dry and wet ingredients: This helps the batter stay smooth and prevents overmixing.
- Watch your oven temperature: An oven thermometer is your best friend here. Too hot can dry the cake; too cool, and it won’t rise properly.
- Frosting consistency matters: If it’s too runny, add more powdered sugar; too stiff, add a splash of cream.
One time, I forgot to add the baking soda (don’t laugh—it happens!), and the cake turned out dense and flat. Lesson learned: baking soda is the secret to that tender crumb. Also, multitasking helps—while the cake bakes, whip up the frosting to save time. Making a mess sometimes leads to the best memories in the kitchen, so don’t stress if you get a bit of gold leaf on your sleeve!
Variations & Adaptations
This black velvet cake is a great base for all kinds of fun twists. Here are a few ways you can customize it:
- Gluten-Free Version: Swap all-purpose flour for a 1:1 gluten-free baking flour blend. Just make sure it contains xanthan gum for structure.
- Dairy-Free Option: Use coconut yogurt in place of buttermilk and a dairy-free cream cheese for frosting. The flavor shifts slightly but remains delicious.
- Seasonal Twist: Add ½ teaspoon cinnamon and a pinch of cayenne to the batter for a warm, spicy kick—perfect for fall birthdays.
- Chocolate Lovers’ Upgrade: Fold in ½ cup (90 g) of mini chocolate chips into the batter for extra melty pockets of goodness.
- Personalized Decorations: Instead of gold stars, try edible silver pearls or colorful sprinkles if you want a different vibe. I once made this with a friend who used rose gold flakes for a wedding shower—it was stunning!
Serving & Storage Suggestions
Serve this cake at room temperature to let the flavors and frosting shine. A cup of strong coffee or a glass of cold milk pairs beautifully with the rich chocolate.
If you’re planning a party, slice the cake into generous wedges and arrange the gold stars so each piece feels like a gift from the night sky. Leftovers? No worries.
- Store leftover cake covered in an airtight container in the refrigerator for up to 4 days.
- For longer storage, freeze slices wrapped tightly in plastic wrap and foil for up to 3 months.
- Reheat refrigerated slices gently in the microwave for 15-20 seconds to bring back that soft texture.
- Flavors develop nicely overnight, so if you can wait, the next day’s slice is usually even better.
Nutritional Information & Benefits
One generous slice (1/12th of the cake) contains approximately:
| Calories | 350 kcal |
|---|---|
| Fat | 18 g |
| Carbohydrates | 45 g |
| Protein | 5 g |
This cake offers a comforting dose of antioxidants from the cocoa powder, which has been linked to heart health benefits. Using real butter and cream cheese adds richness but also provides calcium and vitamin A. If you want to keep it lighter, you can reduce sugar slightly or swap in a sugar alternative, but honestly, a little indulgence now and then is part of the Taurus love for life!
Conclusion
The Perfect Taurus Black Velvet Chocolate Cake with Gold Stars isn’t just a dessert; it’s a little celebration of indulgence, personality, and a touch of magic. Whether you’re baking for a birthday, an astrology-themed party, or simply because you deserve something special, this cake delivers both on taste and style. I love how it brings people together—there’s always that moment when someone spots the gold stars and smiles, and you know you nailed it.
Feel free to play around with the flavors and decorations to make it your own. And hey, if you try this out, I’d love to hear how your cosmic cake turned out—drop a comment below or share your starry creations! Remember, every slice is a little piece of the night sky waiting to be enjoyed.
FAQs
Can I make this cake ahead of time?
Yes! You can bake the cake layers a day in advance and keep them wrapped tightly in plastic wrap. Frost and decorate on the day you plan to serve for best results.
What if I don’t have black food coloring? Can I skip it?
You can skip the black food coloring, but the cake will look more like a dark chocolate color rather than true black velvet. The flavor remains amazing either way.
How do I store leftover decorated cake?
Store it in an airtight container in the fridge for up to 4 days. Let slices come to room temperature before serving.
Are there any good substitutes for edible gold stars?
Yes! You can use edible silver pearls, gold leaf flakes, or even sparkling sugar crystals depending on your preference and occasion.
Can I double this recipe for a larger cake?
Absolutely! Just double all ingredients and bake in larger pans or multiple pans, adjusting the baking time accordingly and checking with a toothpick.
Pin This Recipe!
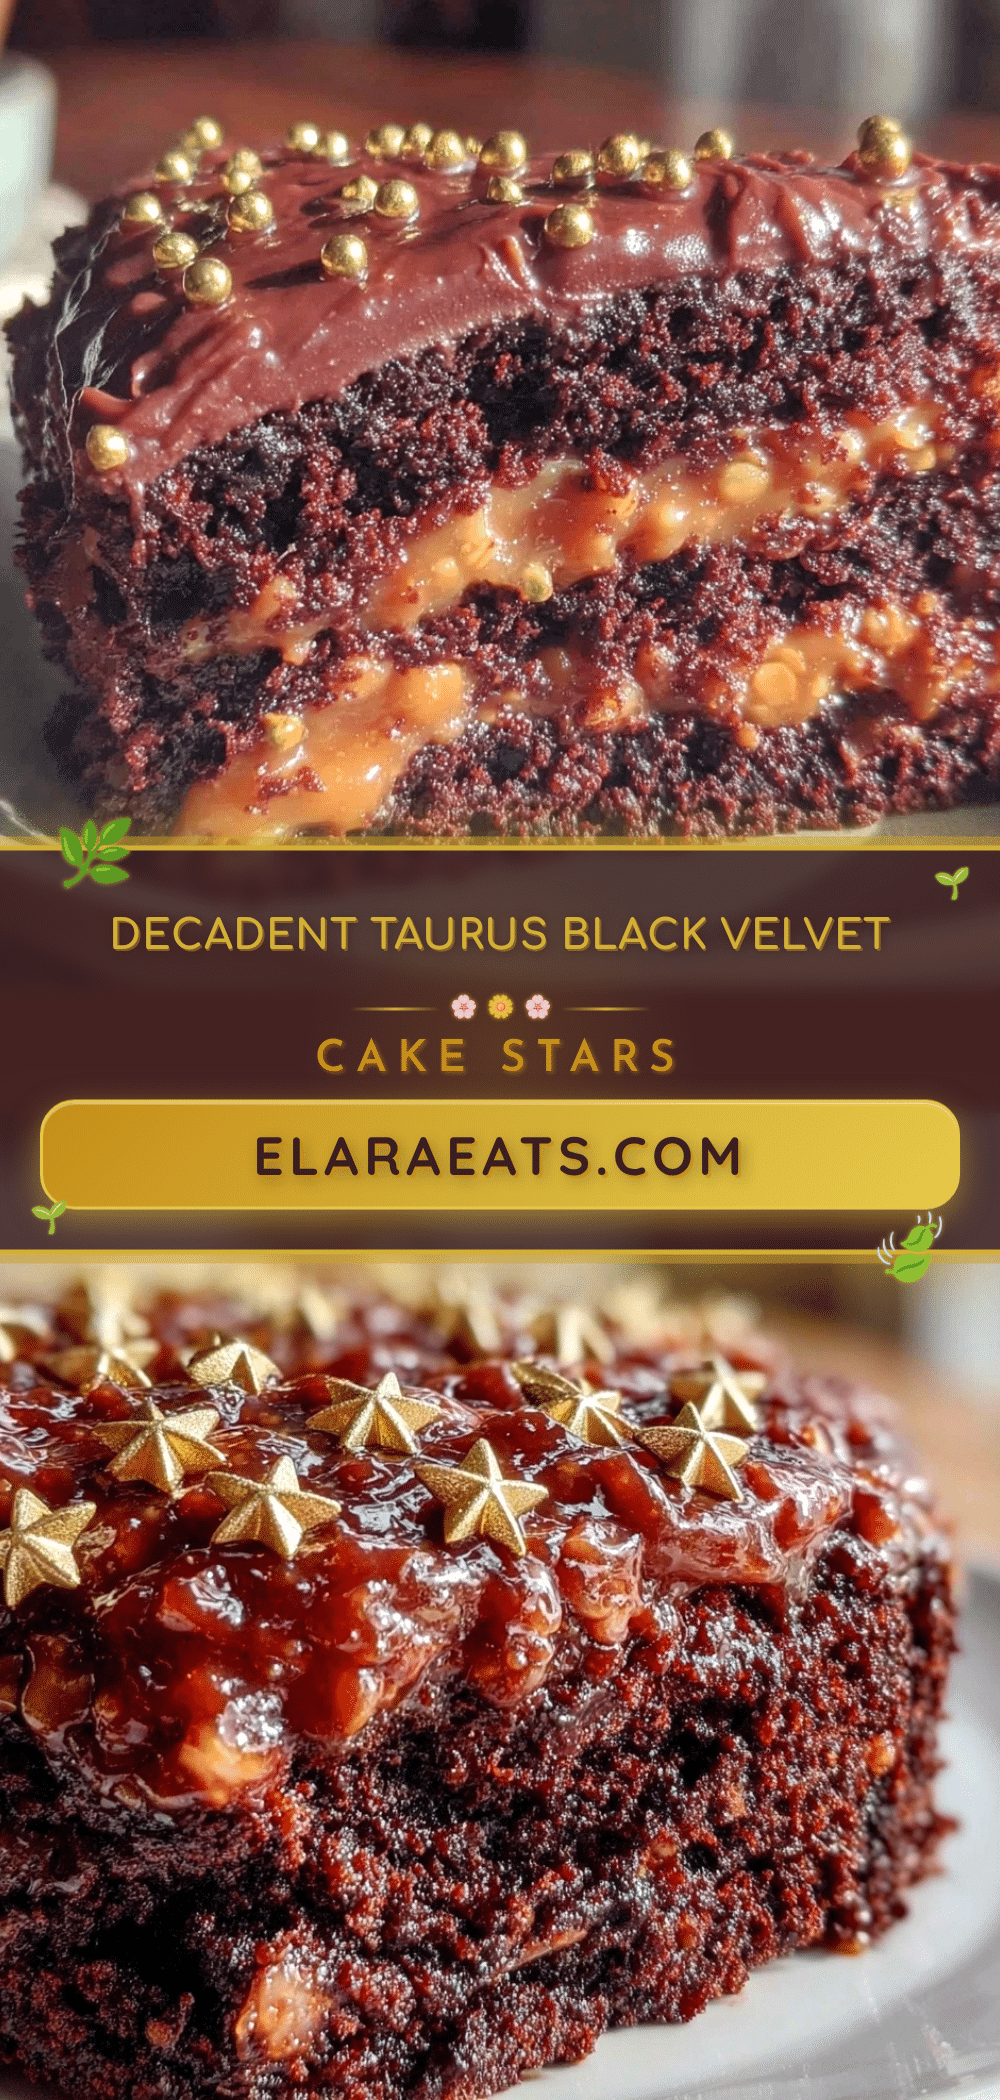
Perfect Taurus Black Velvet Chocolate Cake Recipe with Easy Gold Star Decorations
A rich, indulgent black velvet chocolate cake inspired by the Taurus zodiac sign, featuring a silky crumb and decorated with edible gold stars for a celestial touch.
- Prep Time: 20 minutes
- Cook Time: 35 minutes
- Total Time: 55 minutes
- Yield: 12 servings 1x
- Category: Dessert
- Cuisine: American
Ingredients
- 2 cups (240 g) all-purpose flour, sifted
- 3/4 cup (75 g) unsweetened cocoa powder, preferably Dutch-processed
- 1 1/2 teaspoons baking soda
- 1 teaspoon salt
- 1/2 cup (115 g) unsalted butter, softened
- 1 3/4 cups (350 g) granulated sugar
- 3 large eggs, room temperature
- 1 cup (240 ml) buttermilk, room temperature (or 1 cup milk + 1 tbsp lemon juice, let sit 5 minutes)
- 2 teaspoons vanilla extract
- 1 tablespoon black food coloring gel (optional)
- 8 oz (225 g) cream cheese, softened
- 1/2 cup (115 g) unsalted butter, softened
- 3 cups (360 g) powdered sugar, sifted
- 1 teaspoon vanilla extract
- 2 tablespoons (30 ml) heavy cream
- 20–25 edible gold stars or gold leaf sheets
- Optional: edible glitter for extra sparkle
Instructions
- Preheat the oven to 350°F (175°C). Grease two 8-inch cake pans and line the bottoms with parchment paper.
- In a medium bowl, sift together flour, cocoa powder, baking soda, and salt. Set aside.
- In a large bowl, beat softened butter and granulated sugar with an electric mixer on medium speed until light and fluffy, about 3-4 minutes.
- Add eggs one at a time, beating well after each addition. Mix in vanilla extract and black food coloring gel if using.
- With mixer on low, add dry ingredients in three parts alternating with buttermilk in two parts, starting and ending with dry ingredients. Mix just until combined.
- Divide batter evenly into prepared pans and smooth tops. Bake for 30-35 minutes or until a toothpick inserted in the center comes out clean.
- Cool cakes in pans for 10 minutes, then transfer to wire racks to cool completely.
- For frosting, beat cream cheese and butter until smooth. Gradually add powdered sugar on low speed to avoid sugar cloud. Add vanilla and heavy cream, then beat on medium-high until fluffy and spreadable.
- Place one cake layer on a serving plate. Spread a thick layer of frosting on top, then place the second layer. Frost top and sides smoothly.
- Decorate by carefully placing edible gold stars or gold leaf pieces on the frosting using fingers or a small brush.
Notes
Use Dutch-processed cocoa powder for best color and flavor. If frosting is too soft, chill for 15 minutes before decorating. Avoid overmixing batter to keep cake light. Store leftovers in airtight container in fridge up to 4 days or freeze up to 3 months.
Nutrition
- Serving Size: 1 slice (1/12th of c
- Calories: 350
- Fat: 18
- Carbohydrates: 45
- Protein: 5
Keywords: black velvet cake, chocolate cake, Taurus cake, zodiac cake, gold star decoration, easy chocolate cake, celebration cake