Love this? Save it for later!
Share the inspiration with your friends
It was just past midnight on a random Thursday—a time when most folks are tucked in bed dreaming about the next day. But there I was, standing in my kitchen, half-asleep and craving something sweet, creamy, and unmistakably nostalgic. All I had were a few overripe bananas, a nearly empty box of Nilla Wafers, and cream cheese that was begging to be used. Honestly, I wasn’t aiming to invent anything fancy, just trying to satisfy that stubborn craving without a grocery run. What came together was this creamy banana pudding cheesecake with Nilla wafer crust, and let me tell you, it changed my dessert game forever.
You know that feeling when a recipe just kind of falls into place? The crust was a bit crumbly because I forgot to press it down firmly enough the first time (classic me), but after a quick fix, the flavors melded into something surprisingly rich and comforting. This cheesecake reminds me of those lazy afternoons visiting a small-town diner, where banana pudding was more than just dessert—it was an experience. Maybe you’ve been there, too, chasing a sweet memory with a homemade twist.
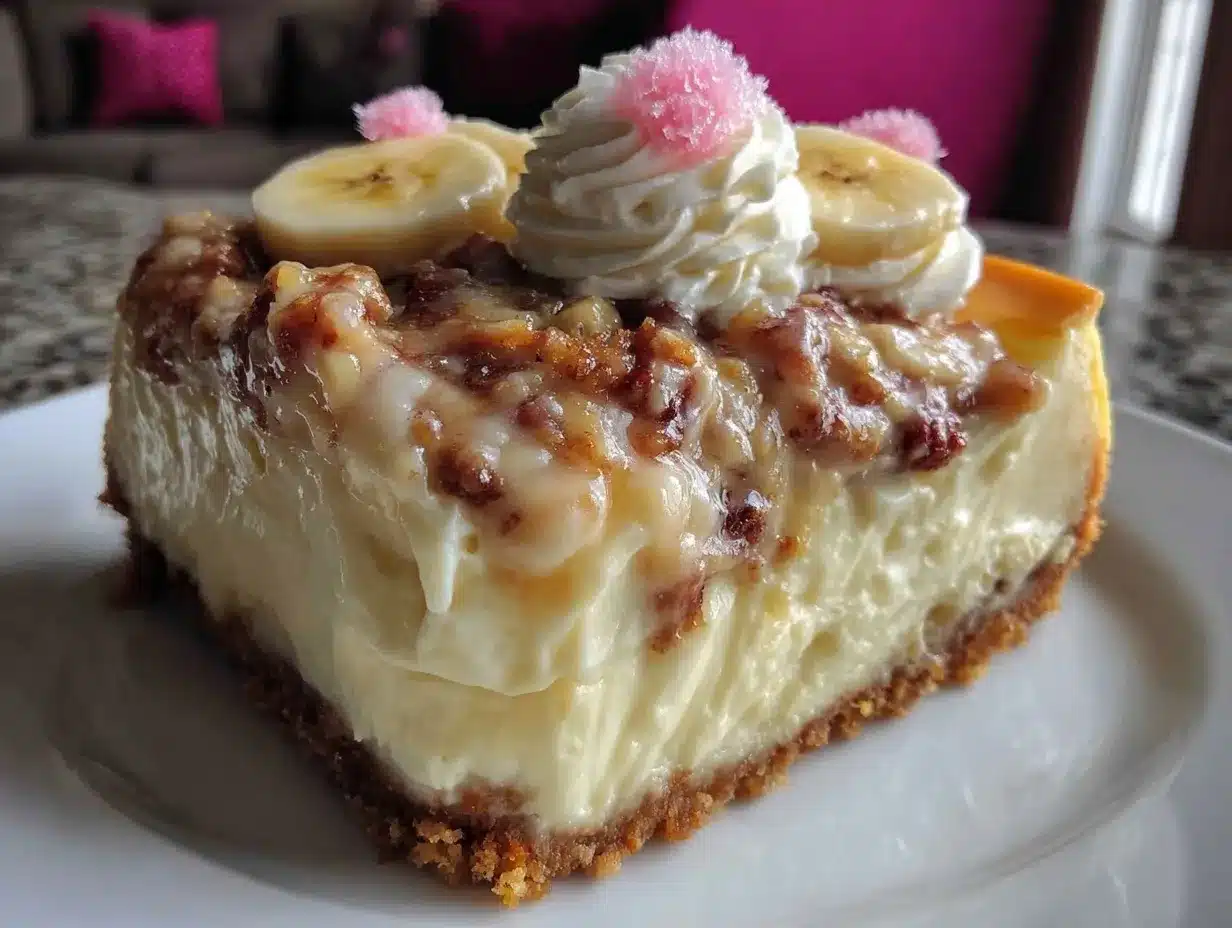
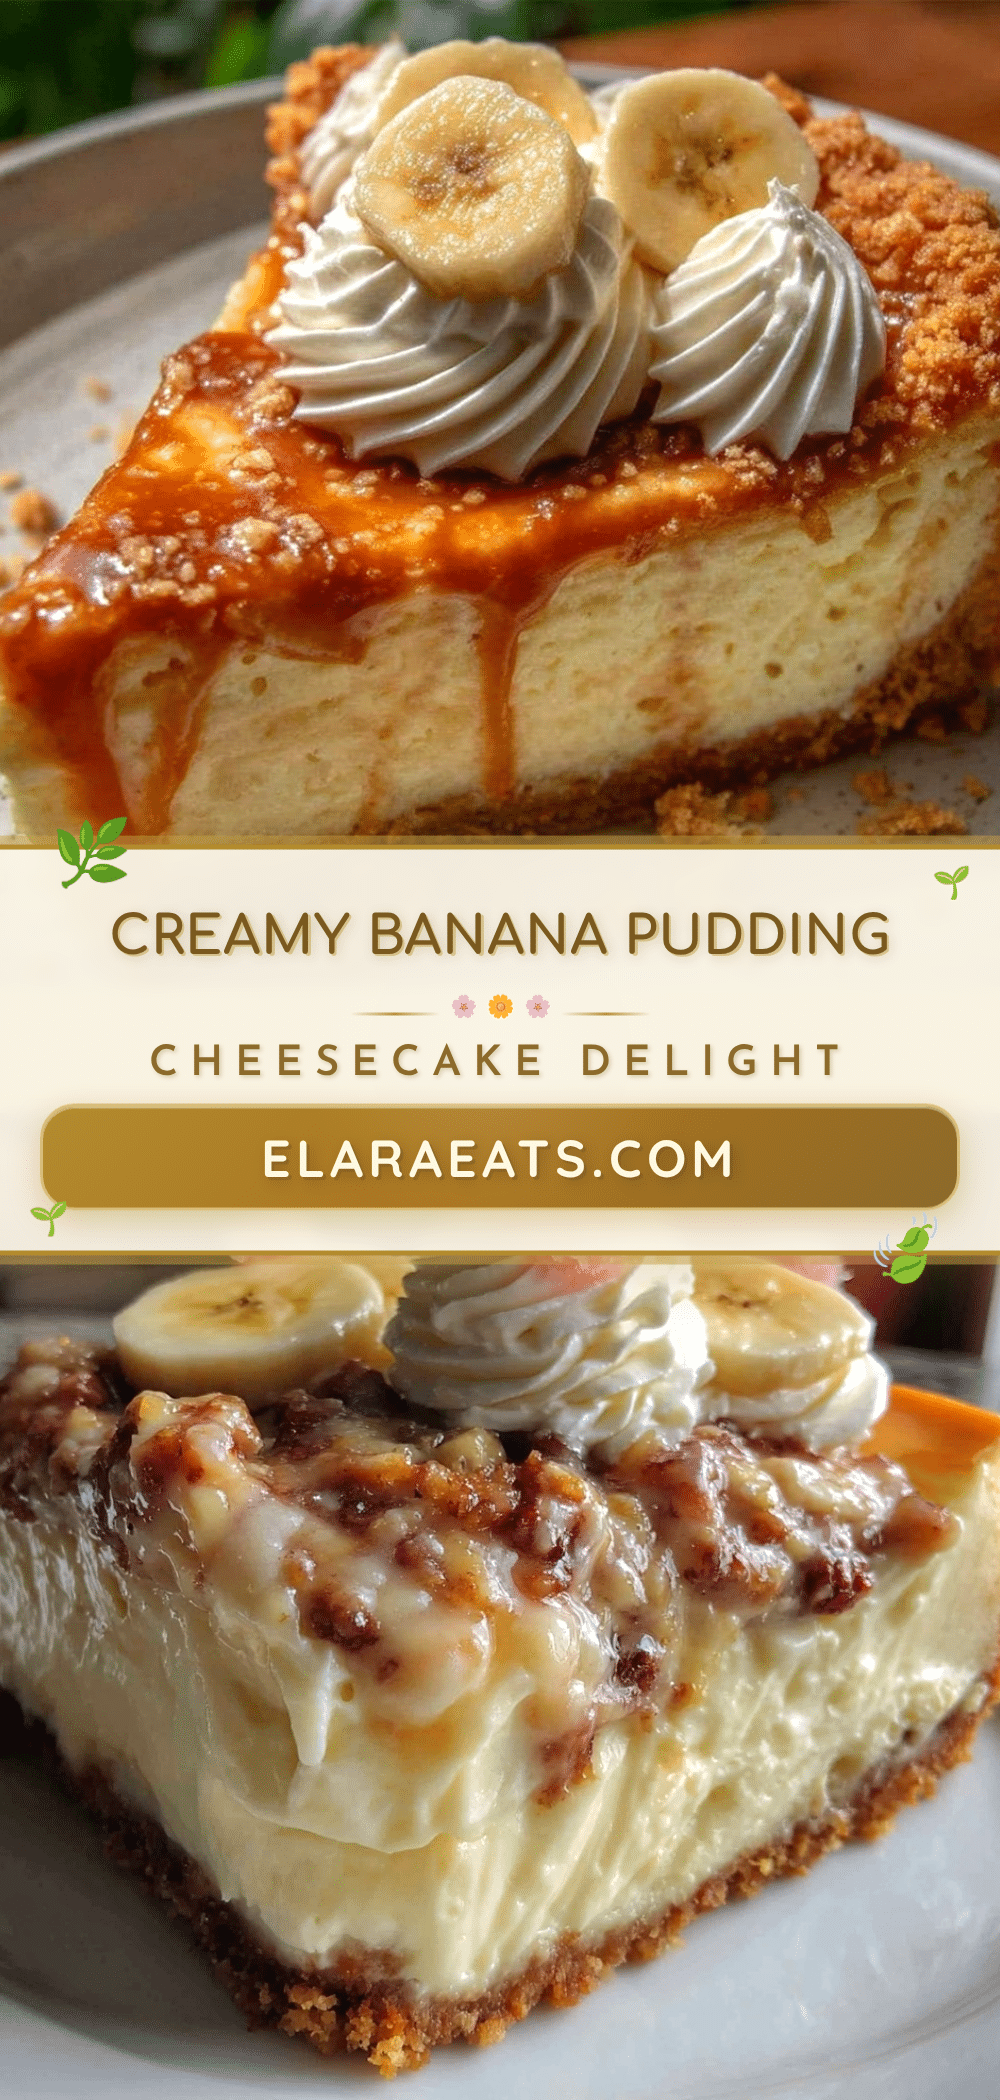
Since that night, this recipe has become a staple. It’s perfect for when guests pop in unexpectedly or when you want to treat yourself after a long day. The silky cheesecake layer balances beautifully with the nostalgic crunch of the Nilla wafer crust and the fresh banana slices tucked inside. Honestly, it’s comfort food done right, without the fuss or the stress. So, if you’re ready for something easy, dreamy, and just a little bit indulgent, let me walk you through making this delightful creamy banana pudding cheesecake with Nilla wafer crust.
Why You’ll Love This Creamy Banana Pudding Cheesecake Recipe
After testing this recipe countless times (yes, I’m serious—I have a fridge full of cheesecake mishaps to prove it), I can confidently say it’s a winner. Here’s why it stands out:
- Quick & Easy: This cheesecake comes together in under 1.5 hours, including baking and cooling time—ideal for those last-minute dessert emergencies.
- Simple Ingredients: You likely already have all the ingredients at home, from cream cheese to ripe bananas and that trusty box of Nilla Wafers.
- Perfect for Potlucks and Family Gatherings: It’s the kind of dessert that disappears fast and leaves everyone asking for seconds.
- Crowd-Pleaser: Kids love the sweet banana flavors, while adults appreciate the creamy, luscious texture and nostalgic vibe.
- Unbelievably Delicious: The silky cheesecake layer paired with the buttery, crunchy crust creates a texture combo that’s downright addictive.
What really makes this recipe different? It’s the homemade Nilla wafer crust that provides a richer, fresher base compared to store-bought crusts. Plus, blending the banana pudding right into the cheesecake batter gives it a subtle banana flavor that’s not overpowering but just enough to bring back those sweet memories. I like to think of this as a love letter to classic banana pudding, but with a creamy, cheesecake twist that feels both familiar and new.
This recipe isn’t just good—it’s the kind of dessert that makes you pause, savor, and maybe even smile with your eyes closed. It’s comfort food with a fresh spin, perfect for those who want to impress without the stress.
What Ingredients You Will Need
This recipe uses simple, wholesome ingredients that blend together to create rich flavor and satisfying texture without any fuss. Most of these are pantry staples, and the bananas add a fresh, natural sweetness.
- For the Nilla Wafer Crust:
- 2 cups Nilla Wafers, crushed (about 180g) — I recommend Keebler for their perfect crunch
- 5 tablespoons unsalted butter, melted (about 70g) — adds richness and helps bind the crust
- 2 tablespoons granulated sugar — balances the buttery flavor
- For the Cheesecake Filling:
- 16 oz (450g) cream cheese, softened — Philadelphia brand gives the smoothest texture
- 1 cup (240ml) banana pudding (store-bought or homemade) — adds authentic banana flavor
- ¾ cup (150g) granulated sugar — sweetens the cheesecake perfectly
- 3 large eggs, room temperature — binds the filling
- 1 teaspoon vanilla extract — enhances overall flavor
- 2 ripe bananas, sliced — fresh banana slices to layer inside and garnish
- ½ cup (120ml) sour cream — keeps the texture creamy and smooth
Ingredient Tips: For the best results, pick bananas that are ripe but not overly mushy—they should have a few brown spots for maximum sweetness. If you want a dairy-free twist, swap the cream cheese and sour cream for coconut-based alternatives, and use a dairy-free banana pudding. You can find gluten-free Nilla Wafer substitutes if needed, or crush gluten-free vanilla cookies for the crust.
Equipment Needed
- 9-inch (23 cm) springform pan: Makes removing the cheesecake effortless and neat. If you don’t have one, a regular cake pan lined with parchment works too, but be extra careful when removing.
- Mixing bowls: At least two — one for crust ingredients, one for the cheesecake batter.
- Electric mixer or stand mixer: Essential for beating the cream cheese until smooth and fluffy. I’ve tried hand mixers, but the electric ones save time and reduce arm fatigue.
- Food processor or rolling pin: To crush the Nilla Wafers finely. I prefer a food processor for even crumbs, but a zip-top bag and rolling pin work just fine.
- Spatula and wooden spoon: For folding ingredients gently and scraping bowls.
- Cooling rack: To cool the cheesecake evenly after baking.
If you’re budget-conscious, a simple hand mixer and a zip-top bag for crushing wafers will do the trick. Just make sure your springform pan is well greased or lined with parchment paper to avoid sticking. I learned the hard way after a cheesecake disaster involving a stuck crust (don’t ask!).
Preparation Method
- Preheat your oven to 325°F (160°C). This moderate temperature gently bakes the cheesecake without cracking.
- Prepare the crust: Crush 2 cups of Nilla Wafers into fine crumbs using a food processor or rolling pin. Combine the crumbs with 5 tablespoons melted unsalted butter and 2 tablespoons sugar in a mixing bowl. Stir until the crumbs are evenly coated and feel slightly damp.
- Press the crust mixture evenly into the bottom of your 9-inch springform pan. Use the bottom of a glass or measuring cup to firmly pack it down. This step is key to avoid a crumbly crust later. Bake the crust for 10 minutes, then remove and let it cool while you prepare the filling.
- Make the cheesecake filling: Using an electric mixer, beat 16 oz softened cream cheese in a large bowl until smooth and creamy (about 2-3 minutes). Add ¾ cup sugar gradually, mixing well.
- Mix in 1 cup banana pudding, ½ cup sour cream, and 1 teaspoon vanilla extract. Beat until combined, scraping down the bowl as needed to avoid lumps.
- Add the eggs one at a time, beating on low speed after each addition. Be careful not to overmix; stop as soon as the eggs are incorporated to prevent cracks during baking.
- Pour half of the cheesecake batter over the cooled crust. Arrange half the sliced bananas over the batter in an even layer.
- Pour the remaining batter on top, then gently spread the rest of the banana slices over the surface.
- Bake the cheesecake: Place the springform pan on a middle rack and bake for 50-60 minutes. The edges should be set, but the center will have a slight jiggle when you gently shake the pan.
- Cool the cheesecake: Turn off the oven and leave the cheesecake inside with the door slightly open for 1 hour. This gradual cooling helps prevent cracks.
- Refrigerate the cheesecake for at least 4 hours, preferably overnight. This allows the flavors to meld and the texture to set perfectly.
- Before serving, run a knife around the edges to loosen the cheesecake, then remove the springform ring. Slice and enjoy!
Tip: If you notice cracks after baking, don’t worry—covering the cheesecake with fresh banana slices and whipped cream usually hides them beautifully. Also, I learned that letting the cheesecake rest in the oven after baking is a game-changer for a smooth top.
Cooking Tips & Techniques
Cheesecake can be tricky, but a few key techniques will make your creamy banana pudding cheesecake shine. First, always use room temperature cream cheese and eggs. Cold ingredients create lumps and uneven mixing. I once skipped this step and ended up with a lumpy mess—lesson learned!
When mixing, use low speed after adding eggs to avoid incorporating too much air, which can cause cracks. Speaking of cracks, baking your cheesecake in a water bath is a classic trick, but for this recipe, I found that baking without one and letting the cheesecake cool gradually works just as well and is less messy.
Pressing the crust firmly is crucial. If you don’t pack it down, the crust will crumble apart when slicing. I usually press it down with a flat-bottomed glass—simple but effective. Also, keeping the bananas fresh-looking is important; tossing slices in a little lemon juice prevents browning.
Timing is everything. Multitasking while the crust bakes (cleaning up, prepping bananas) helps save time. Lastly, don’t rush the chilling process. Cheesecake needs those hours in the fridge to firm up and develop flavor.
Variations & Adaptations
This recipe is versatile! Here are some ways to switch it up:
- Gluten-Free Version: Replace Nilla Wafers with gluten-free vanilla cookies or crushed almond flour and adjust butter accordingly.
- Chocolate Banana Twist: Add ½ cup mini chocolate chips to the batter or swirl melted chocolate over the top before baking.
- Vegan Adaptation: Use vegan cream cheese, coconut yogurt in place of sour cream, flax eggs (1 tablespoon flaxseed meal + 3 tablespoons water = 1 egg), and a dairy-free banana pudding.
- Seasonal Fruit Swap: In summer, try fresh peaches or strawberries instead of bananas for a different fruity flair.
- Personal Favorite: I once tried mixing a teaspoon of cinnamon into the crust and a splash of rum extract into the batter. It added a warm, cozy depth that was unexpected but delightful.
Serving & Storage Suggestions
This cheesecake is best served chilled, straight from the fridge. The creamy texture softens the crispness of the crust beautifully. A dollop of whipped cream and an extra sprinkle of crushed Nilla Wafers on top add a nice touch. Pair it with a cup of strong coffee or a cold glass of milk for a classic combo.
Store leftovers in an airtight container in the refrigerator for up to 4 days. If you want to keep it longer, wrap tightly with plastic wrap and freeze for up to 2 months. Thaw in the fridge overnight before serving.
Reheating cheesecake is usually not recommended, but if you want a slightly softer texture, let it sit at room temperature for 15-20 minutes before slicing.
Fun fact: the flavors actually deepen after a day or two, so if you can wait, it’s even better the next day!
Nutritional Information & Benefits
One generous slice (about 1/12 of the cheesecake) has approximately:
| Calories | 320 kcal |
|---|---|
| Protein | 6g |
| Carbohydrates | 35g |
| Fat | 17g |
| Fiber | 1.5g |
The bananas add natural sweetness and potassium, while the cream cheese provides protein and calcium. Using real ingredients means less processed sugar and more wholesome flavor. This dessert fits well into a balanced diet when enjoyed in moderation.
If you have dairy allergies, swapping for plant-based alternatives makes this a friendly option for various dietary needs. It’s not low-calorie, but it’s a satisfying treat that feels like a hug in dessert form.
Conclusion
This creamy banana pudding cheesecake with Nilla wafer crust is a delicious twist on two classic favorites, blending nostalgic flavors with smooth, dreamy texture. It’s simple enough for a weeknight treat but special enough to wow guests. I love how it brings that familiar comfort food vibe with a fresh, homemade touch.
Feel free to tweak the recipe to your liking—add a sprinkle of cinnamon, swap fruits, or try a gluten-free crust. Cooking is all about making recipes your own, after all. If you give this a try, I’d love to hear how it turned out for you! Drop a comment below or share your own creative spins.
Happy baking, and may your kitchen be filled with sweet memories!
FAQs about Creamy Banana Pudding Cheesecake with Nilla Wafer Crust
Can I make this cheesecake ahead of time?
Absolutely! It actually tastes better after chilling overnight, as the flavors meld and the texture firms up perfectly.
What if I don’t have a springform pan?
You can use a regular cake pan lined with parchment paper, but be extra careful when removing the cheesecake to avoid cracks or breaks.
How do I prevent the bananas from browning?
Toss the banana slices lightly in lemon juice before adding them to the cheesecake. This keeps them looking fresh and appealing.
Can I freeze leftover cheesecake?
Yes! Wrap it tightly in plastic wrap and freeze for up to 2 months. Thaw in the fridge overnight before serving.
Is it possible to make this recipe vegan?
Yes, using vegan cream cheese, flax eggs, coconut yogurt, and dairy-free banana pudding lets you enjoy a dairy-free version with great results.
For another creamy dessert that’s a breeze to pull together, you might enjoy my classic no-bake cheesecake recipe. And if you’re a fan of desserts with crunchy cookie bases, the crispy garlic chicken post shares a technique I adapted for a cookie crust that works wonders!
Pin This Recipe!
Creamy Banana Pudding Cheesecake Recipe Easy Homemade Nilla Wafer Crust

A creamy banana pudding cheesecake with a homemade Nilla wafer crust that blends nostalgic banana pudding flavors with smooth, dreamy cheesecake texture. Perfect for potlucks, family gatherings, or a comforting treat.
- Prep Time: 20 minutes
- Cook Time: 1 hour 10 minutes
- Total Time: 5 hours 30 minutes
- Yield: 12 servings 1x
- Category: Dessert
- Cuisine: American
Ingredients
- 2 cups Nilla Wafers, crushed (about 180g)
- 5 tablespoons unsalted butter, melted (about 70g)
- 2 tablespoons granulated sugar
- 16 oz (450g) cream cheese, softened
- 1 cup (240ml) banana pudding (store-bought or homemade)
- 3/4 cup (150g) granulated sugar
- 3 large eggs, room temperature
- 1 teaspoon vanilla extract
- 2 ripe bananas, sliced
- 1/2 cup (120ml) sour cream
Instructions
- Preheat your oven to 325°F (160°C).
- Crush 2 cups of Nilla Wafers into fine crumbs using a food processor or rolling pin.
- Combine the crumbs with 5 tablespoons melted unsalted butter and 2 tablespoons sugar in a mixing bowl. Stir until the crumbs are evenly coated and feel slightly damp.
- Press the crust mixture evenly into the bottom of your 9-inch springform pan. Use the bottom of a glass or measuring cup to firmly pack it down.
- Bake the crust for 10 minutes, then remove and let it cool while you prepare the filling.
- Using an electric mixer, beat 16 oz softened cream cheese in a large bowl until smooth and creamy (about 2-3 minutes). Add 3/4 cup sugar gradually, mixing well.
- Mix in 1 cup banana pudding, 1/2 cup sour cream, and 1 teaspoon vanilla extract. Beat until combined, scraping down the bowl as needed to avoid lumps.
- Add the eggs one at a time, beating on low speed after each addition. Stop as soon as the eggs are incorporated to prevent cracks during baking.
- Pour half of the cheesecake batter over the cooled crust.
- Arrange half the sliced bananas over the batter in an even layer.
- Pour the remaining batter on top, then gently spread the rest of the banana slices over the surface.
- Place the springform pan on a middle rack and bake for 50-60 minutes. The edges should be set, but the center will have a slight jiggle when you gently shake the pan.
- Turn off the oven and leave the cheesecake inside with the door slightly open for 1 hour to cool gradually.
- Refrigerate the cheesecake for at least 4 hours, preferably overnight.
- Before serving, run a knife around the edges to loosen the cheesecake, then remove the springform ring. Slice and enjoy!
Notes
Use ripe bananas with a few brown spots for maximum sweetness. Press the crust firmly to avoid crumbling. Toss banana slices in lemon juice to prevent browning. Let the cheesecake cool gradually in the oven after baking to prevent cracks. Refrigerate overnight for best texture and flavor. For dairy-free or vegan versions, substitute cream cheese and sour cream with plant-based alternatives and use flax eggs.
Nutrition
- Serving Size: 1 slice (1/12 of che
- Calories: 320
- Fat: 17
- Carbohydrates: 35
- Fiber: 1.5
- Protein: 6
Keywords: banana pudding cheesecake, Nilla wafer crust, creamy cheesecake, easy cheesecake recipe, homemade crust, banana dessert, potluck dessert