Love this? Save it for later!
Share the inspiration with your friends
My brother-in-law Mark swore he hated cheese poppers. For years. Every Super Bowl party, every game day gathering, he’d walk right past the appetizer table like those little golden bites were personally offending him. “Too greasy,” he’d say with a sniff. “And they’re always either soggy or the cheese leaks out everywhere.” Honestly, I didn’t blame him. Most versions are exactly that—a sad, oily mess.
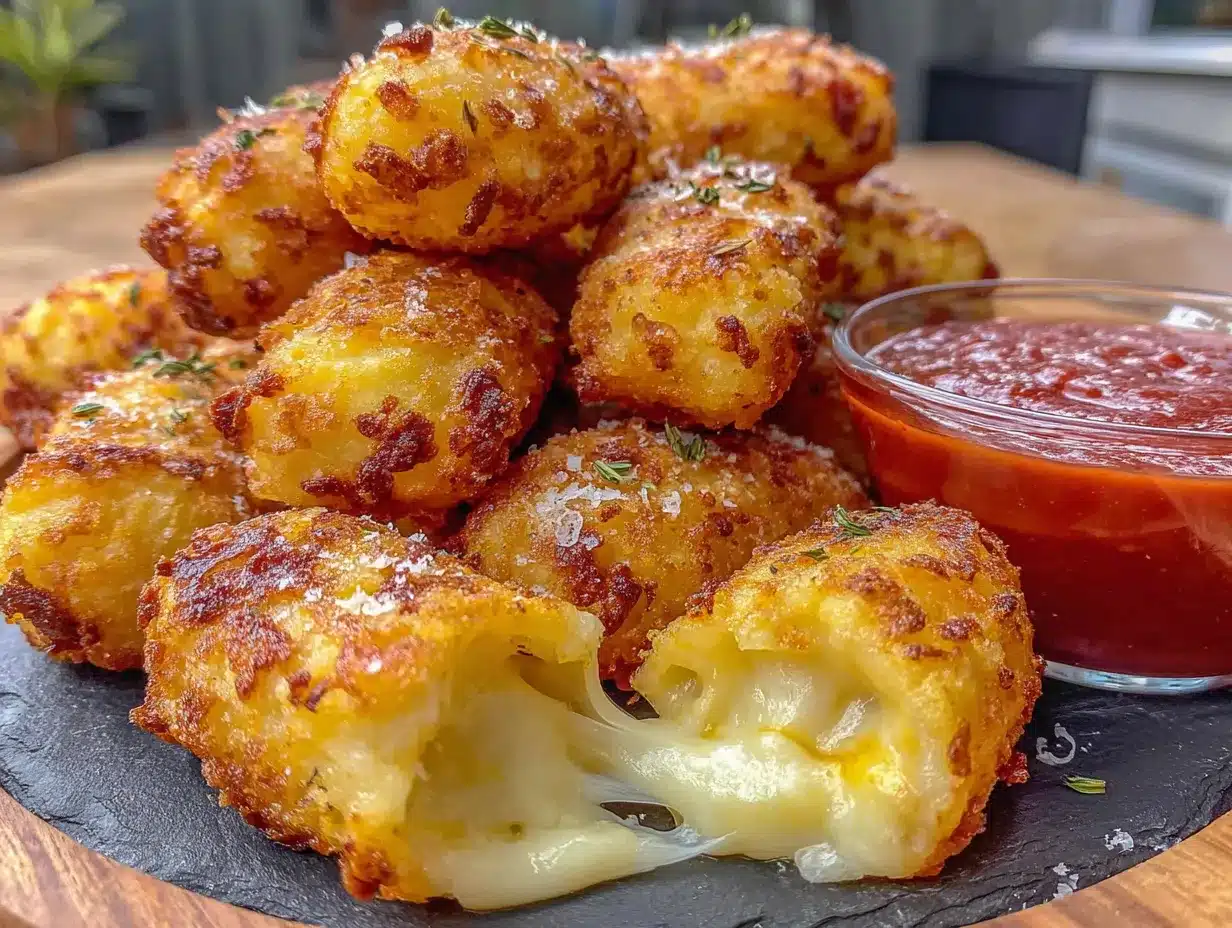
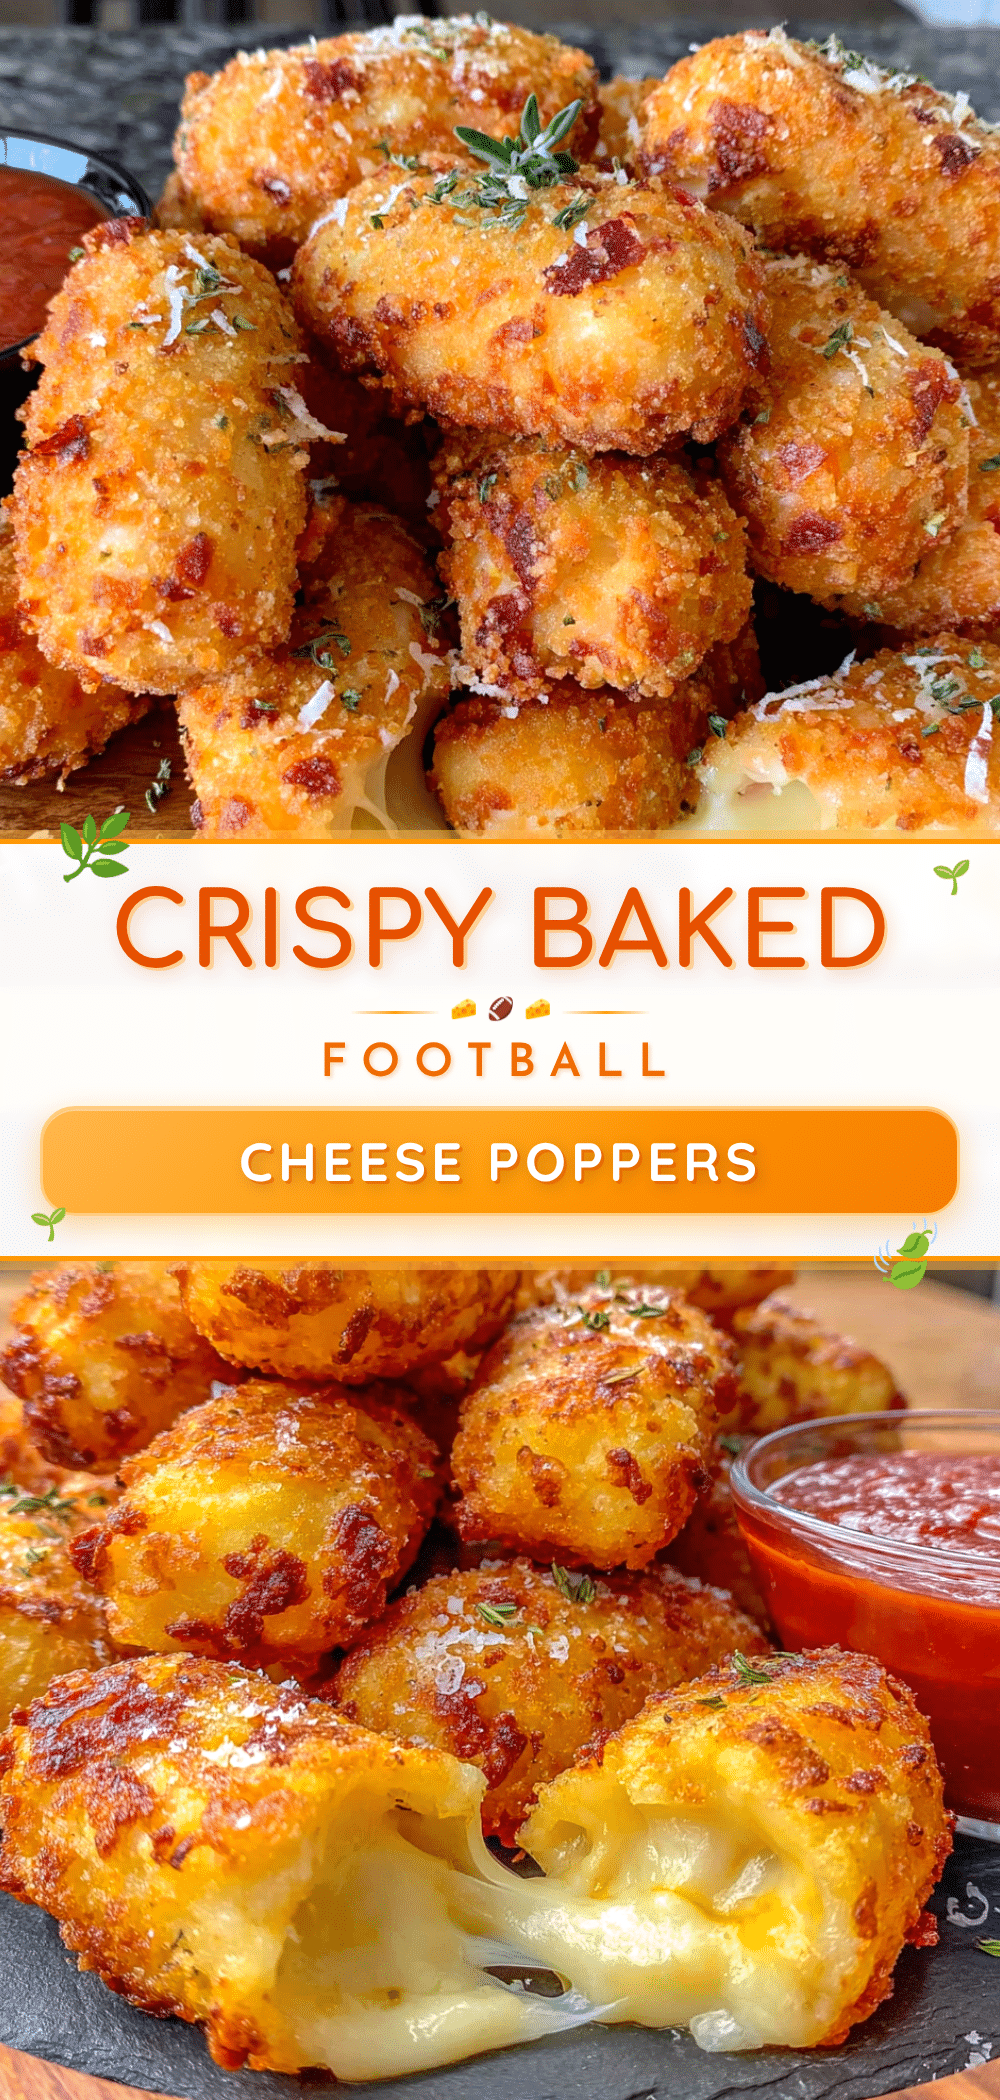
Then last October, during a particularly tense Sunday night game against the Packers, I made a batch of these crispy baked football cheese poppers just for myself. I wasn’t trying to prove anything. I just wanted something crunchy, cheesy, and warm without standing over a pot of hot oil. I pulled them out of the oven, arranged them on a platter, and turned back to the TV. When I looked over five minutes later, Mark had three of them on his plate and was reaching for a fourth.
“These are different,” he mumbled through a mouthful. And that’s the thing—they really are. Baking them changes everything. You get that satisfying crunch without the grease, and the cheese stays perfectly gooey inside because of a little trick I figured out after a few failed batches. Maybe you’ve been there, staring at a recipe that promises the world but delivers a plate of disappointment. This one actually delivers. I keep making them because they’re the kind of snack that disappears before halftime, and honestly, watching Mark eat his words is pretty satisfying too.
Why You’ll Love This Recipe
Let me be straight with you. These crispy baked football cheese poppers aren’t just another appetizer to throw on the table. They’re the result of trial and error, a few burnt fingers, and one particularly memorable evening where I learned the hard way that not all cheese melts the same way. Here’s why they work.
- Quick & Easy: From start to finish, you’re looking at about 30 minutes. That’s less time than it takes to watch a quarter of football. Perfect for when guests show up early or you realize you forgot to plan anything.
- Simple Ingredients: No trips to specialty stores. No hunting down obscure ingredients. You probably have most of this stuff in your kitchen right now, which is exactly how game day snacks should be.
- Perfect for Game Day: These poppers are built for the big game. They hold up well on a buffet table, they’re easy to eat with one hand while holding a drink, and they pair beautifully with everything from cold beer to spicy Bloody Marys.
- Crowd-Pleaser: I’ve served these to kids, picky eaters, and self-proclaimed cheese popper haters like Mark. They disappear every single time. There’s something about that crispy exterior giving way to molten cheese that just works on a primal level.
- Unbelievably Delicious: The texture is where these really shine. The panko coating gets incredibly crunchy in the oven—I’m talking that satisfying crackle when you bite into them. And the inside stays creamy and gooey because we’re using a combination of cheeses that melt at different rates. It’s not rocket science, but it makes a difference.
What sets this version apart is the baking technique. Most recipes either fry them (hello, grease splatters) or bake them with breadcrumbs that turn soft and sad. I use a double-coating method with panko and a quick spray of oil that gives you that fried texture without the mess. Plus, I freeze the cheese balls for ten minutes before baking. That little step keeps the cheese from leaking out and creating a greasy puddle on your baking sheet. Trust me, I learned that one the hard way.
This recipe isn’t just good—it’s the kind that makes you close your eyes after the first bite. It’s comfort food reimagined: healthier, faster, but with the same soul-soothing satisfaction. Perfect for impressing guests without stress, or turning a simple game day into something memorable.
What Ingredients You Will Need
This recipe uses simple, wholesome ingredients to deliver bold flavor and satisfying crunch without the fuss. Most of these are pantry staples, and I’ve included notes on substitutions so you can adapt based on what you have on hand.
- 8 ounces cream cheese, softened (full-fat works best for texture, but Neufchâtel is fine if you want to cut some calories)
- 1 cup shredded sharp cheddar cheese (I prefer Tillamook or Cabot for their bold flavor and good melting properties)
- ½ cup shredded mozzarella cheese (low-moisture, part-skim works best here—it gives that stretchy pull without making things too wet)
- ¼ cup grated Parmesan cheese (the real stuff in a wedge, not the green can—it adds a salty, nutty depth that’s hard to replicate)
- 1 jalapeño, seeded and finely diced (leave some seeds in if you want heat; remove them all for a milder version)
- 2 tablespoons chopped fresh chives (or green onions in a pinch—they add a mild onion flavor that cuts through the richness)
- ½ teaspoon garlic powder
- ½ teaspoon onion powder
- ¼ teaspoon smoked paprika (regular paprika works too, but smoked adds that subtle barbecue vibe that screams game day)
- Salt and black pepper to taste
- 1 cup all-purpose flour (for the coating station)
- 2 large eggs, beaten (room temperature helps them adhere better)
- 1 ½ cups panko breadcrumbs (regular breadcrumbs get soggy—panko is non-negotiable for that crunch)
- ½ teaspoon garlic powder (for the panko mixture)
- ½ teaspoon dried oregano (optional, but adds an Italian-inspired twist that pairs well with marinara)
- Cooking spray (avocado oil spray is my go-to for its high smoke point and neutral flavor)
For serving, you’ll want marinara sauce, ranch dressing, or spicy sriracha mayo for dipping. I usually make all three because people have strong opinions about their dipping sauces.
Equipment Needed
You don’t need a professional kitchen for these poppers, but having the right tools makes the process smoother. Here’s what you’ll need:
- Large mixing bowl for the cheese mixture
- Three shallow bowls or pie plates for the breading station (one for flour, one for eggs, one for panko)
- Baking sheet (a half-sheet pan works perfectly—line it with parchment paper or a silicone baking mat for easy cleanup)
- Small cookie scoop or melon baller (optional, but it makes uniform balls and keeps your hands cleaner)
- Plastic wrap for chilling the cheese balls before breading
- Wire rack (if you have one, placing it on the baking sheet helps air circulate and keeps the bottoms crispy)
- Cooling rack for after baking
If you don’t have a cookie scoop, just use your hands—lightly wet them first to prevent sticking. And if you don’t have a wire rack, no worries. Just flip the poppers halfway through baking to ensure even browning. I’ve done it both ways, and while the wire rack gives slightly better results, flipping works just fine.
Preparation Method
Let’s get cooking. This recipe moves fast once you start, so read through everything first and set up your stations. Trust me, you don’t want to be hunting for the flour while your hands are covered in cheese mixture.
- Make the cheese mixture. In a large bowl, combine the softened cream cheese, shredded cheddar, mozzarella, Parmesan, diced jalapeño, chives, garlic powder, onion powder, smoked paprika, and a pinch of salt and pepper. Mix until everything is evenly distributed. Taste it—yes, raw cheese mixture is safe to taste—and adjust seasoning. I usually add a bit more black pepper here because it cuts through the richness.
- Chill the mixture. Cover the bowl with plastic wrap and refrigerate for 20 minutes. This step is crucial. If the mixture is too soft, you’ll end up with misshapen poppers that fall apart during breading. I learned this the hard way during a particularly frustrating attempt where my poppers looked more like cheese pancakes.
- Form the balls. Using a small cookie scoop or your hands, portion the chilled mixture into 1-inch balls. You should get about 20 to 24 poppers, depending on how generous you are. Roll each one gently between your palms to smooth them out. Place them on a parchment-lined baking sheet.
- Freeze for 10 minutes. Pop the baking sheet into the freezer. This is my secret weapon. Those 10 minutes firm up the cheese balls just enough that they hold their shape during breading and baking. The cheese stays inside where it belongs instead of leaking out and making a mess.
- Set up your breading station. While the cheese balls are freezing, arrange three shallow bowls: one with the flour, one with the beaten eggs, and one with the panko mixed with the extra garlic powder and dried oregano (if using). Line them up in that order—flour, egg, panko.
- Bread the poppers. Working with one cheese ball at a time, roll it in the flour until coated, shaking off any excess. Dip it into the beaten eggs, letting any excess drip off. Finally, roll it in the panko mixture, pressing gently so the crumbs adhere. Place the breaded popper back on the baking sheet. Repeat with all the cheese balls. If you notice your fingers getting sticky, rinse them off between batches—it keeps the breading from clumping on your hands.
- Preheat your oven to 400°F (200°C). While the oven heats, let the breaded poppers rest on the baking sheet for 5 minutes. This helps the coating set so it doesn’t slide off during baking.
- Spray with oil. Give the poppers a generous spray with cooking oil. Don’t skip this step. The oil is what gives them that golden, crispy exterior. Without it, you’ll end up with pale, sad poppers that lack crunch.
- Bake for 12 to 15 minutes. Place the baking sheet in the preheated oven. Bake until the poppers are golden brown and the cheese is bubbly. At the 8-minute mark, check them. If they’re browning unevenly, rotate the pan. If you’re not using a wire rack, flip each popper gently at the 8-minute mark for even browning.
- Let them rest. Remove the poppers from the oven and let them cool on the baking sheet for 3 to 5 minutes. This is important—the cheese inside is molten hot and needs a moment to set up. Biting into one too early is a guaranteed burned tongue. I speak from experience here.
- Serve immediately. Transfer the poppers to a serving platter with your chosen dipping sauces. They’re best eaten within 15 minutes of coming out of the oven, when the exterior is still crunchy and the cheese is perfectly gooey.
Cooking Tips & Techniques
After making these poppers more times than I care to count, I’ve collected a few hard-won lessons. Here are the ones that matter most.
Don’t skip the chilling and freezing steps. I know it adds time, but it’s the difference between perfect poppers and a cheese explosion in your oven. The cold cheese holds its shape during breading, and the brief freeze ensures the center stays solid long enough for the exterior to crisp up. I once tried to rush this step because guests were arriving in 20 minutes. The result was a baking sheet covered in melted cheese and a kitchen that smelled like burned dairy for days.
Use your hands for the panko coating. I’ve tried using forks, tongs, and even chopsticks to keep my hands clean. None of them work as well as just using your fingers. The gentle pressure helps the panko adhere, and you can feel if any spots are bare. Just keep a damp paper towel nearby to wipe your hands between batches.
Watch your oven temperature. Every oven runs differently. If your poppers are browning too quickly on the bottom but staying pale on top, your oven might run hot. Try reducing the temperature to 375°F (190°C) and baking for a few extra minutes. Conversely, if they’re not browning after 12 minutes, your oven might be running cool. Adjust accordingly.
Make extra. These poppers disappear fast. I’ve learned to double the recipe for any gathering with more than four people. They’re also great for meal prep—you can assemble and bread them up to a day ahead, then bake them fresh when you’re ready to serve.
Keep an eye on the clock. The difference between perfect and overdone is about two minutes. Set a timer for 10 minutes and check them. You’re looking for deep golden brown, not dark brown. Remember, carryover cooking continues after they come out of the oven, so pull them when they look just slightly underdone.
Variations & Adaptations
One of the best things about this recipe is how easily it adapts. Here are some variations I’ve tried and loved.
Spicy Buffalo Version: Add 2 tablespoons of buffalo sauce to the cheese mixture and substitute the jalapeño with a finely diced serrano pepper. Serve with blue cheese dressing instead of ranch. The heat from the buffalo sauce mellows during baking, leaving behind a tangy, spicy flavor that’s perfect for those who like things hot.
Loaded Baked Potato Style: Mix in ¼ cup of cooked, crumbled bacon and 2 tablespoons of finely chopped green onions. The smoky bacon adds a savory depth that pairs beautifully with the creamy cheese filling. This version disappears fastest at every party I’ve brought it to.
Gluten-Free Option: Substitute the all-purpose flour with a 1:1 gluten-free flour blend and use gluten-free panko breadcrumbs. I’ve tested this with Bob’s Red Mill 1:1 Baking Flour and Schär gluten-free breadcrumbs, and the results are nearly identical to the original. Just make sure your gluten-free panko is finely textured—some brands have larger crumbs that don’t adhere as well.
Vegetarian and Low-Carb Adjustments: The base recipe is already vegetarian. For a low-carb version, swap the panko for crushed pork rinds mixed with Parmesan cheese. The texture is slightly different—crunchier, almost like a fried chicken coating—but it works surprisingly well. Just reduce the baking time by 2 minutes since pork rinds brown faster.
Italian Herb Twist: Add 1 teaspoon of dried Italian seasoning to the panko mixture and serve with warm marinara sauce. The herbs infuse the coating with a fragrant aroma that makes these feel like a fancy appetizer, even though they’re dead simple to make.
Serving & Storage Suggestions
These poppers are best served hot, straight from the oven. Arrange them on a platter with small bowls of dipping sauce placed around them. I like to scatter a few extra chopped chives over the top for color—it makes them look more polished without any extra effort.
For dipping, I always offer at least three options: classic marinara, cool ranch dressing, and a spicy sriracha mayo (just mix sriracha with mayonnaise to taste). The contrast between the hot, crispy popper and the cold, creamy ranch is especially good. If you’re serving these at a party, set out toothpicks or small forks so guests can grab them easily.
Storage: If you have leftovers (unlikely, but possible), let them cool completely, then store them in an airtight container in the refrigerator for up to 3 days. The texture will soften, but they’re still delicious cold or reheated.
Reheating: The best way to reheat these is in the oven or air fryer. Preheat your oven to 350°F (175°C) and bake the poppers for 5 to 7 minutes, or until heated through and crispy again. The microwave works in a pinch, but the coating will turn soft. If you’re using an air fryer, reheat at 350°F (175°C) for 3 to 4 minutes—they come out almost as good as fresh.
Freezing: You can freeze the unbaked, breaded poppers on a baking sheet until solid, then transfer them to a freezer bag. They’ll keep for up to 2 months. Bake them straight from frozen, adding 3 to 5 minutes to the cooking time. This is a lifesaver when you need a last-minute appetizer for unexpected guests.
One thing I’ve noticed: the flavors actually deepen after a day in the fridge. The garlic and jalapeño meld together, and the cheese becomes more pronounced. So if you’re making these ahead for a party, consider baking them a day in advance and reheating just before serving.
Nutritional Information & Benefits
Per serving (about 4 poppers), here’s the estimated nutritional breakdown:
- Calories: 280
- Total Fat: 18g
- Saturated Fat: 10g
- Cholesterol: 85mg
- Sodium: 420mg
- Total Carbohydrates: 16g
- Dietary Fiber: 1g
- Sugars: 2g
- Protein: 12g
These numbers are estimates and will vary based on exact ingredients and portion sizes. The protein content comes primarily from the cheese and eggs, making these more filling than your average snack. The calcium from the cheese is a nice bonus—about 15% of your daily recommended intake per serving.
If you’re watching your sodium, use low-sodium cheeses and skip the added salt in the cheese mixture. You can also reduce the Parmesan, which is naturally high in sodium. For a lighter version, substitute half the cream cheese with Greek yogurt—it cuts the fat while keeping the creamy texture.
These poppers are vegetarian-friendly and can be made gluten-free with the substitutions mentioned earlier. They contain dairy and gluten (unless modified), so keep that in mind for guests with allergies.
Personally, I don’t make these for their health benefits. I make them because they make people happy. But it’s nice to know they’re not completely empty calories—the protein and calcium at least give them a little nutritional redemption.
Conclusion
These crispy baked football cheese poppers are everything you want in a game day snack: crunchy, cheesy, satisfying, and surprisingly easy to make. They prove that you don’t need a deep fryer to get that perfect golden crust, and you don’t need complicated techniques to impress your guests. Just good ingredients, a little patience, and a willingness to learn from a few burnt fingers along the way.
I love this recipe because it’s the one that changed my brother-in-law’s mind. It’s the one that makes people say, “Wait, these are baked?” with genuine surprise. And it’s the one that disappears fastest at every party, which is really the highest compliment any appetizer can receive.
I’d love to hear how yours turn out. Did you try the buffalo version? Add bacon? Find a new dipping sauce that blew your mind? Drop a comment below and share your creation. And if you’re looking for more game day inspiration, check out our slow cooker buffalo chicken dip or these baked sweet potato wedges for a complete spread. Happy cooking, and may your cheese always stay melty!
Frequently Asked Questions
Can I make these cheese poppers ahead of time?
Absolutely. You can assemble and bread the poppers up to 24 hours in advance. Store them on a baking sheet in the refrigerator, covered with plastic wrap. Bake them fresh just before serving for the best texture.
Why did my cheese leak out during baking?
This usually happens when the cheese mixture isn’t chilled enough before baking. Make sure you refrigerate the mixture for at least 20 minutes and freeze the formed balls for 10 minutes. Also, check that your poppers are fully coated with flour—any bare spots can become weak points where cheese escapes.
Can I use an air fryer instead of an oven?
Yes! Air fryers work great for these poppers. Preheat your air fryer to 375°F (190°C), spray the basket with oil, and arrange the poppers in a single layer. Cook for 8 to 10 minutes, shaking the basket halfway through. They come out even crispier than the oven version.
What’s the best cheese combination for these poppers?
I recommend a mix of cream cheese for creaminess, sharp cheddar for flavor, mozzarella for stretch, and Parmesan for saltiness. You can experiment with other cheeses like pepper jack for heat or Gouda for a smoky twist, but stick with this base for the best texture.
How do I keep the poppers crispy if I’m serving them at a party?
Serve them on a wire rack set over a baking sheet rather than on a plate or platter. This allows air to circulate underneath and prevents steam from softening the coating. If you’re keeping them warm, place them in a low oven (200°F/95°C) on a wire rack for up to 30 minutes.
Pin This Recipe!
Crispy Baked Football Cheese Poppers: Best Easy Game Day Recipe
These crispy baked football cheese poppers are the perfect game day snack: crunchy, cheesy, and satisfying without the grease of frying. A double-coating method with panko and a quick freeze keeps the cheese gooey inside while the exterior gets perfectly golden in the oven.
- Prep Time: 20 minutes
- Cook Time: 15 minutes
- Total Time: 35 minutes
- Yield: 4 servings 1x
- Category: Appetizer
- Cuisine: American
Ingredients
- 8 ounces cream cheese, softened
- 1 cup shredded sharp cheddar cheese
- ½ cup shredded mozzarella cheese (low-moisture, part-skim)
- ¼ cup grated Parmesan cheese
- 1 jalapeño, seeded and finely diced
- 2 tablespoons chopped fresh chives
- ½ teaspoon garlic powder
- ½ teaspoon onion powder
- ¼ teaspoon smoked paprika
- Salt and black pepper to taste
- 1 cup all-purpose flour
- 2 large eggs, beaten
- 1 ½ cups panko breadcrumbs
- ½ teaspoon garlic powder (for panko mixture)
- ½ teaspoon dried oregano (optional)
- Cooking spray (avocado oil spray recommended)
- Marinara sauce, ranch dressing, or spicy sriracha mayo for dipping
Instructions
- Make the cheese mixture: In a large bowl, combine softened cream cheese, shredded cheddar, mozzarella, Parmesan, diced jalapeño, chives, garlic powder, onion powder, smoked paprika, and a pinch of salt and pepper. Mix until evenly distributed. Taste and adjust seasoning.
- Chill the mixture: Cover the bowl with plastic wrap and refrigerate for 20 minutes.
- Form the balls: Using a small cookie scoop or your hands, portion the chilled mixture into 1-inch balls. Roll each one gently between your palms to smooth them out. Place on a parchment-lined baking sheet.
- Freeze for 10 minutes: Pop the baking sheet into the freezer to firm up the cheese balls.
- Set up breading station: Arrange three shallow bowls: one with flour, one with beaten eggs, and one with panko mixed with extra garlic powder and dried oregano (if using).
- Bread the poppers: Working one at a time, roll each cheese ball in flour, shaking off excess. Dip into beaten eggs, letting excess drip off. Roll in panko mixture, pressing gently to adhere. Place back on baking sheet. Repeat with all.
- Preheat oven to 400°F (200°C). Let breaded poppers rest on baking sheet for 5 minutes.
- Spray with oil: Generously spray poppers with cooking oil.
- Bake for 12 to 15 minutes until golden brown and cheese is bubbly. At 8-minute mark, rotate pan if needed. If not using a wire rack, flip poppers gently at 8 minutes.
- Let rest: Remove from oven and cool on baking sheet for 3 to 5 minutes.
- Serve immediately with dipping sauces.
Notes
Don’t skip the chilling and freezing steps—they prevent cheese from leaking. Use your hands for panko coating for best adhesion. Watch oven temperature; adjust if browning too fast or slow. Make extra as they disappear quickly. Can be assembled and breaded up to a day ahead.
Nutrition
- Serving Size: 4 poppers
- Calories: 280
- Sugar: 2
- Sodium: 420
- Fat: 18
- Saturated Fat: 10
- Carbohydrates: 16
- Fiber: 1
- Protein: 12
Keywords: cheese poppers, baked cheese poppers, game day appetizer, football snack, crispy cheese balls, easy appetizer