Love this? Save it for later!
Share the inspiration with your friends
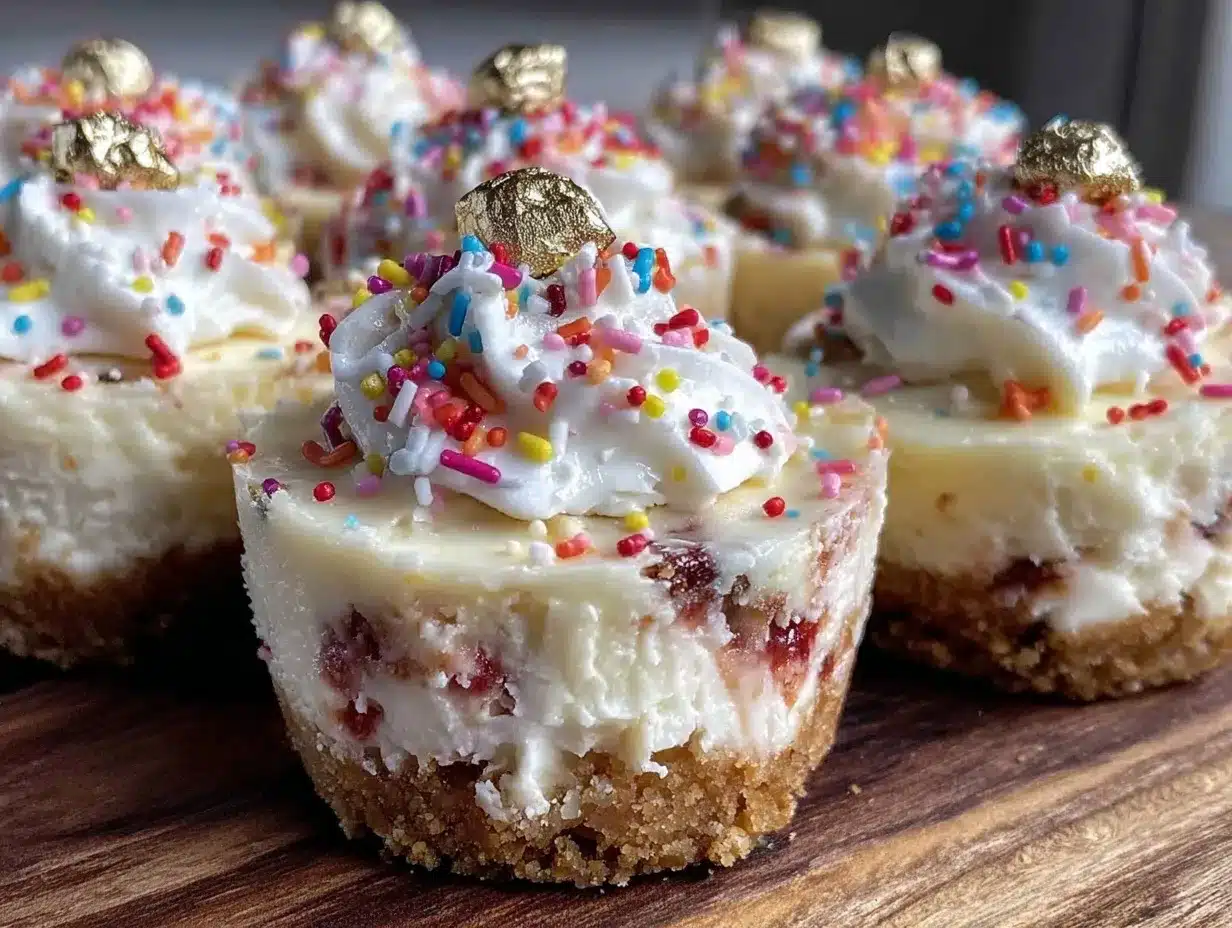
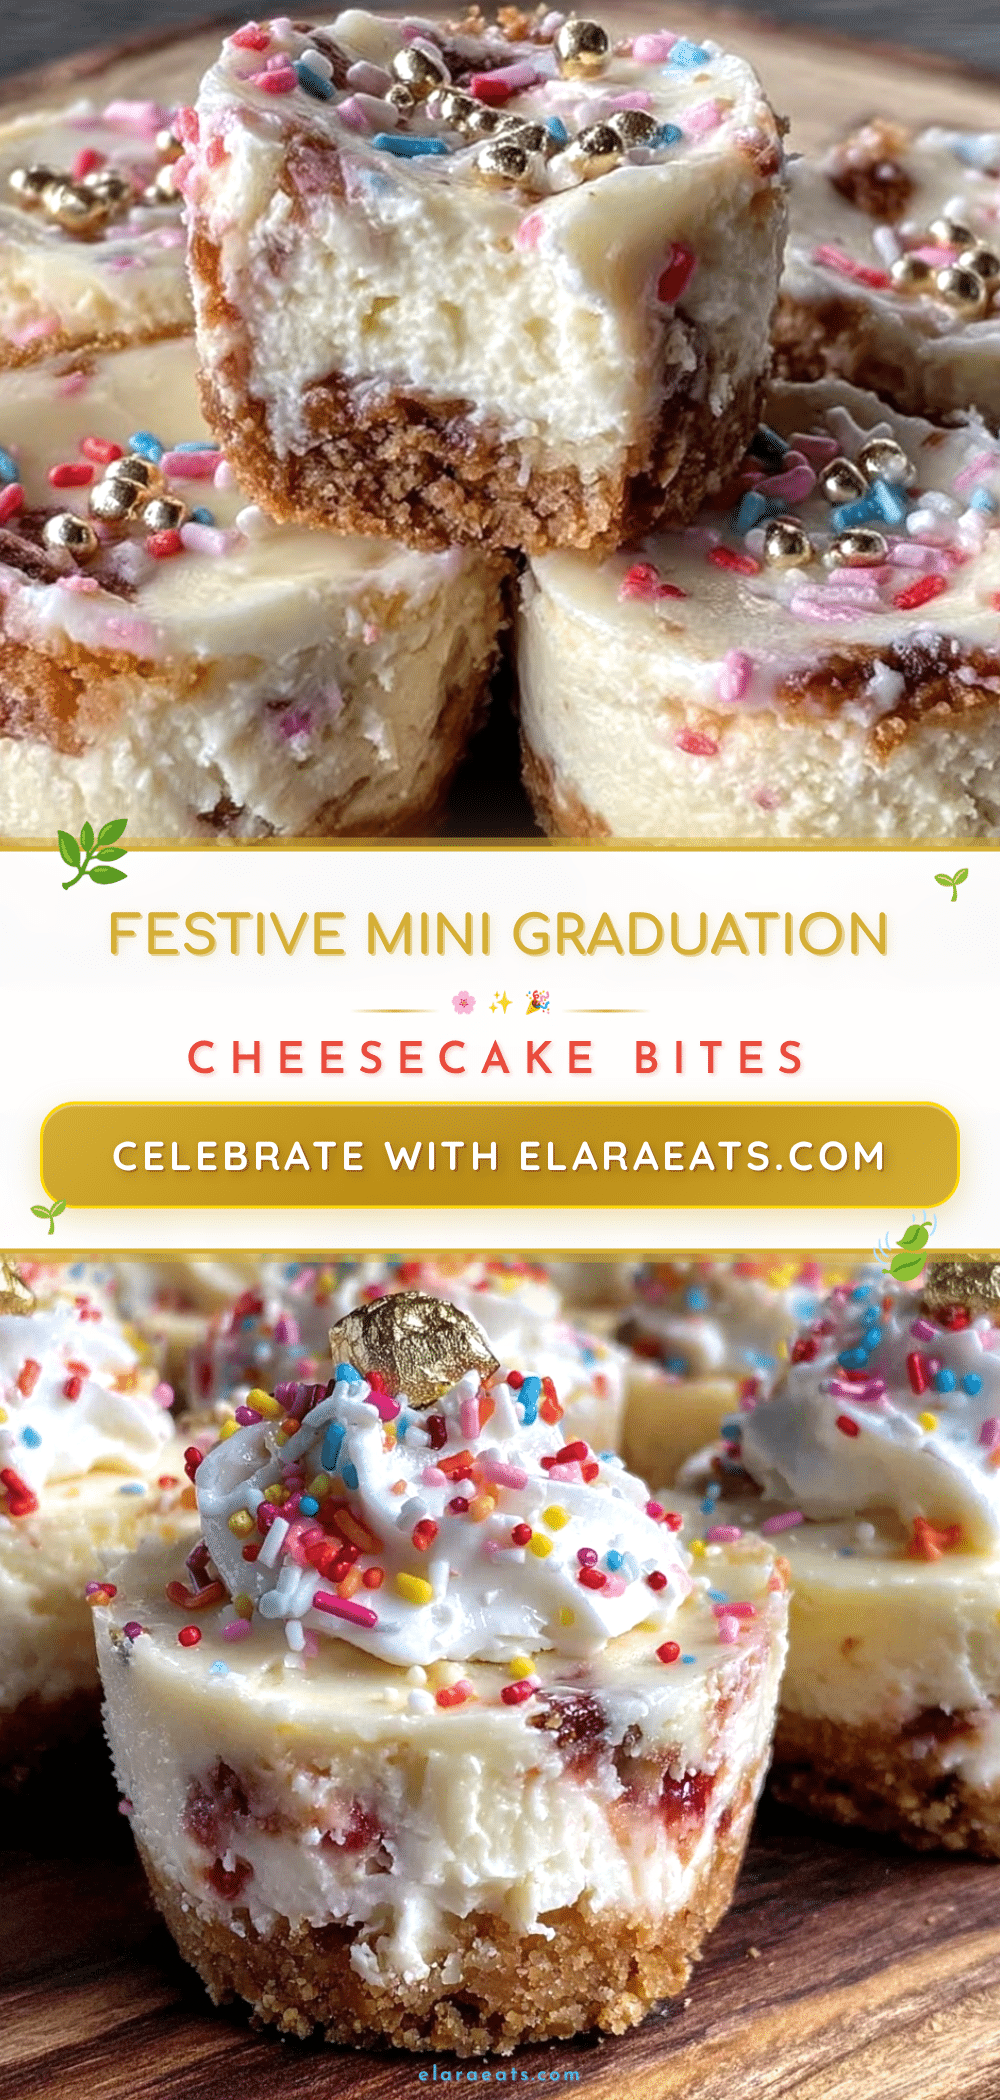
“You know that feeling when a celebration calls for something sweet, but nothing too big or messy?” That’s exactly how these Perfect Mini Graduation Cheesecake Bites with Festive Gold Caps found their way into my kitchen. It was the afternoon before my niece’s graduation party, and honestly, I was in full-on procrastination mode. I had promised a dessert that felt special but didn’t involve me spending hours baking a giant cake or wrestling with complicated layers.
Then, while rummaging through the pantry, I spotted a half-used cream cheese block and some graham crackers. An idea sparked—why not bite-sized cheesecakes? Mini, manageable, and perfect for a crowd that included kids and adults alike. I grabbed the gold edible glitter I had from a previous baking spree (you know, the stuff you keep because it “might come in handy”), and decided to make tiny caps on top to mimic graduation hats.
The whole process was a bit chaotic—I forgot to preheat the oven at first, and my dog decided the wrapper from the cream cheese was a chew toy. Despite the mess, the results were a hit. The creamy cheesecake paired with the crisp crust was pure joy, and the gold caps added that festive touch that made everyone smile. I mean, who doesn’t like a dessert that tastes amazing and looks like a party all on its own? Maybe you’ve been there, scrambling last minute but wanting to serve something memorable. These cheesecake bites have since become my go-to for celebrations big and small, and I swear they’ll have you grinning just as much as the graduates.
Why You’ll Love This Recipe
Making the Perfect Mini Graduation Cheesecake Bites is honestly one of those wins that feels like magic—simple, quick, and impressive. As someone who’s tested countless cheesecake recipes, these bites stand out not just for their size but for their texture and festive flair. Here’s why you’ll want to make them again and again:
- Quick & Easy: Ready in under an hour, these bites are perfect when time’s tight but you want to impress.
- Simple Ingredients: With pantry staples like cream cheese, graham crackers, and eggs, you probably have everything on hand already.
- Perfect for Celebrations: Graduation, birthdays, or any party that needs a little sparkle without fuss.
- Crowd-Pleaser: Kids love the fun gold caps, and adults appreciate the creamy, rich flavor.
- Unbelievably Delicious: The balance between the buttery crust and silky cheesecake is just right—no grainy texture here.
What really sets this recipe apart is the gold cap tutorial—those tiny edible mortarboards really steal the show. Plus, the cheesecake filling is my perfected blend for smoothness and tang, tested over multiple batches to avoid cracks or soggy bottoms. Honestly, making these bites feels like you’re crafting little pieces of joy, and the look on everyone’s face when they see the gold caps? Priceless. If you’re into quick desserts that look gourmet, this is your new best friend.
What Ingredients You Will Need
This recipe uses simple, wholesome ingredients to deliver bold flavor and satisfying texture without the fuss. Most are pantry basics, and a few little extras bring the festive touch. Here’s what you’ll gather:
- For the crust:
- 1 1/2 cups graham cracker crumbs (about 10 full crackers, finely crushed)
- 1/4 cup granulated sugar
- 6 tablespoons unsalted butter, melted (I prefer Land O’Lakes for richness)
- For the cheesecake filling:
- 16 ounces cream cheese, softened (use Philadelphia for the creamiest texture)
- 2/3 cup granulated sugar
- 2 large eggs, room temperature
- 1 teaspoon vanilla extract (pure vanilla is best)
- 1/2 cup sour cream or Greek yogurt (adds tang and smoothness)
- 1 tablespoon all-purpose flour (helps prevent cracking)
- For the festive gold caps:
- Edible gold dust or gold luster dust (grab from baking aisles or specialty stores)
- Mini chocolate squares or thin chocolate discs (to mimic the mortarboard)
- Thin licorice strings or black sugar pearls (for the tassels)
Substitution tips: For gluten-free crust, swap graham crackers for almond flour or gluten-free cookie crumbs. Use coconut yogurt as a dairy-free option for sour cream. If you prefer a less sweet crust, reduce sugar by a tablespoon.
Equipment Needed
- Muffin tin or mini cheesecake pan (12-cup size works perfectly)
- Paper cupcake liners (to prevent sticking and for easy serving)
- Mixing bowls (one large and one medium)
- Electric mixer or hand mixer (helps achieve a smooth filling)
- Measuring cups and spoons (accuracy makes a difference here)
- Spatula (for scraping bowls clean)
- Small brush or clean fingertip (for applying gold dust)
If you don’t have a mini cheesecake pan, a muffin tin lined with sturdy cupcake liners is just fine. I once used a silicone muffin tray, and while the cheesecakes popped out easily, the bottoms were a bit softer—just be gentle when removing. For gold dust, a small artist’s brush works wonders for precise application. And always keep your mixer beaters clean between steps to avoid lumps.
Preparation Method
- Preheat the oven to 325°F (163°C). Line a 12-cup muffin tin with paper liners. This step is crucial to make sure the cheesecakes don’t stick and are easy to serve.
- Make the crust: In a medium bowl, combine 1 1/2 cups graham cracker crumbs and 1/4 cup sugar. Pour in the melted butter and stir until the mixture resembles wet sand.
- Press crust into muffin cups: Using the back of a spoon or your fingers, firmly press about 1 tablespoon of the crust mixture into the bottom of each liner. Aim for an even layer, about 1/4 inch thick. I like to slightly compact it so it holds well after baking.
- Bake crusts for 8 minutes. This pre-bake step helps avoid sogginess later. Remove from the oven and let cool while you prepare the filling.
- Prepare cheesecake filling: In a large bowl, beat the softened cream cheese with 2/3 cup sugar until smooth and fluffy—about 2-3 minutes. Scrape down the sides to avoid lumps.
- Add eggs, one at a time: Beat in two eggs, mixing well after each addition. Then stir in 1 teaspoon vanilla extract.
- Mix in sour cream and flour: Add 1/2 cup sour cream (or Greek yogurt) and 1 tablespoon all-purpose flour. Mix gently until smooth. The flour helps stabilize the batter, keeping it creamy without cracks.
- Fill muffin cups: Pour the cheesecake batter evenly over the cooled crusts, filling each about 3/4 full. I find using a small cookie scoop helps keep portions uniform.
- Bake cheesecakes for 18-22 minutes. They should be set around the edges but still slightly jiggly in the center—like a soft jelly. Overbaking leads to cracks, so keep a close eye.
- Cool completely at room temperature, then refrigerate for at least 3 hours. This chilling step is key for the texture to firm up beautifully.
- Decorate with festive gold caps: Once chilled, use a small brush to dust mini chocolate squares with edible gold dust. Place one gold “cap” on top of each cheesecake bite. Attach a licorice string or black sugar pearl as a tassel. This step adds that special graduation vibe that’s simple but impressive.
Pro tip: If you notice any cracks, don’t stress—cover them with a gold cap or fresh berries. Also, I recommend chilling the cream cheese and eggs beforehand; it makes mixing easier and yields a smoother batter.
Cooking Tips & Techniques
Making mini cheesecakes might seem straightforward, but a few tricks make all the difference between “meh” and “wow.” Here’s what I’ve learned through trial and error:
- Room temperature ingredients: Make sure your cream cheese and eggs are not cold. Cold cream cheese lumps up and messes with texture. Warm ingredients blend effortlessly.
- Don’t overmix: Once you add eggs, mix just until combined to avoid incorporating too much air. Overmixing can cause cracks and a spongy texture.
- Prebake the crust: This step stops sogginess and gives a nice crunch contrast to the creamy filling.
- Watch the baking time: Mini cheesecakes bake faster than full-size ones. Pull them out when the edges are set but centers still jiggle slightly.
- Use a water bath (optional): For ultra-smooth cheesecakes, try placing the muffin tin inside a larger pan with hot water halfway up the sides. It regulates heat and reduces cracks.
- Cooling matters: Rapid cooling can cause cracks. Let cheesecakes cool slowly at room temperature before chilling.
- Gold dust application: Use a small, soft brush to apply edible gold dust on the chocolate caps gently; it’s easy to overdo and end up with a mess.
I remember one time rushing the baking and ended up with cracked tops everywhere—lesson learned! Patience really pays off here. Also, multitasking helps: while the crust bakes, prep the filling to save time. Trust me, these tips make the process smoother and the results more consistent.
Variations & Adaptations
If you want to switch things up, this recipe is great for customizing according to what’s in your kitchen or your taste buds.
- Flavor twists: Add lemon zest and a teaspoon of fresh lemon juice to the filling for a bright, citrusy note. Or swirl in raspberry puree for a colorful, fruity burst.
- Dietary adaptations: Use gluten-free graham cracker crumbs or almond flour for the crust to make it gluten-free. Swap sour cream with coconut cream for a dairy-free version.
- Cooking methods: These bites can be baked in a convection oven at a slightly lower temperature (300°F/150°C) for a more even bake. Alternatively, try no-bake mini cheesecakes by chilling the filling with gelatin and skipping the oven altogether.
- Decoration ideas: Instead of gold caps, top with fresh berries, edible flowers, or a drizzle of chocolate ganache for different occasions.
- Personal variation: I once added a teaspoon of espresso powder to the filling. It gave a subtle mocha flavor that paired beautifully with the gold decoration. Definitely worth trying if you love coffee flavors!
Serving & Storage Suggestions
These mini cheesecakes are best served chilled. I like to take them out of the fridge about 10 minutes before serving so they soften slightly, making each bite melt in your mouth. Arrange them on a pretty platter or tiered stand to showcase the gold caps—they really pop in photos and on the dessert table.
Pair them with a light sparkling wine or a fruity iced tea for a refreshing contrast. They also go well alongside crispy garlic chicken if you’re creating a full party menu with savory dishes.
For storage, keep them covered in an airtight container in the fridge for up to 4 days. If you want to prep ahead, these cheesecake bites freeze beautifully—just thaw in the fridge overnight before serving. The flavors actually deepen with time, so if anything, they get better.
Reheat is generally not recommended, but if you prefer them less chilled, just let them sit at room temperature for a bit. The gold caps stay intact longer when chilled, so save decoration until just before guests arrive.
Nutritional Information & Benefits
Each mini cheesecake bite (makes 12) contains approximately:
| Calories | Fat | Protein | Carbs | Sugar |
|---|---|---|---|---|
| 180 kcal | 12 g | 4 g | 14 g | 10 g |
Key ingredients like cream cheese provide calcium and protein, while the graham cracker crust adds fiber. Using sour cream or Greek yogurt boosts probiotics and tang. This recipe is naturally gluten-containing unless you swap the crust ingredients, so be mindful if you’re gluten-sensitive. It’s a treat that balances indulgence with some nutritional perks.
Conclusion
So there you have it—the Perfect Mini Graduation Cheesecake Bites with Festive Gold Caps that turn any celebration into a sweet success. They’re easy to make, crowd-pleasing, and look downright adorable with those little golden hats. I love this recipe because it’s not just dessert; it’s a conversation starter, a memory-maker, and honestly, a tiny bit of joy on a plate.
Feel free to tweak the flavors or decorations to fit your party vibe. And hey, if you try these bites, comment below with your favorite variations or tips—I’m always excited to hear your stories. Here’s to creating sweet moments that taste as good as they look!
FAQs
Can I make these mini cheesecakes ahead of time?
Absolutely! You can bake them a day ahead and keep them refrigerated. Just add the gold caps right before serving for the freshest look.
What can I use instead of graham crackers for the crust?
For a gluten-free option, almond flour or gluten-free cookie crumbs work well. You can also try crushed digestive biscuits.
How do I prevent cracks on the cheesecake surface?
Use room temperature ingredients, avoid overmixing, and bake until just set with a slight jiggle in the center. Cooling slowly helps too.
Are there vegan alternatives for this recipe?
Yes! Use vegan cream cheese, plant-based yogurt, and a vegan butter substitute. Baking times may vary slightly.
Can I make a larger cheesecake using this recipe?
You can! Just multiply the ingredients accordingly and bake in a springform pan at 325°F (163°C) for about 45-60 minutes, checking for doneness.
Pin This Recipe!
Perfect Mini Graduation Cheesecake Bites with Festive Gold Caps
These mini cheesecake bites are quick, easy, and perfect for celebrations. They feature a creamy cheesecake filling on a buttery graham cracker crust, topped with festive edible gold caps resembling graduation hats.
- Prep Time: 15 minutes
- Cook Time: 30 minutes
- Total Time: 3 hours 45 minutes
- Yield: 12 servings 1x
- Category: Dessert
- Cuisine: American
Ingredients
- 1 1/2 cups graham cracker crumbs (about 10 full crackers, finely crushed)
- 1/4 cup granulated sugar
- 6 tablespoons unsalted butter, melted
- 16 ounces cream cheese, softened
- 2/3 cup granulated sugar
- 2 large eggs, room temperature
- 1 teaspoon vanilla extract
- 1/2 cup sour cream or Greek yogurt
- 1 tablespoon all-purpose flour
- Edible gold dust or gold luster dust
- Mini chocolate squares or thin chocolate discs
- Thin licorice strings or black sugar pearls
Instructions
- Preheat the oven to 325°F (163°C). Line a 12-cup muffin tin with paper liners.
- In a medium bowl, combine graham cracker crumbs and 1/4 cup sugar. Pour in melted butter and stir until mixture resembles wet sand.
- Press about 1 tablespoon of crust mixture into the bottom of each liner, forming an even 1/4 inch thick layer.
- Bake crusts for 8 minutes. Remove from oven and let cool.
- In a large bowl, beat softened cream cheese with 2/3 cup sugar until smooth and fluffy, about 2-3 minutes.
- Add eggs one at a time, mixing well after each addition. Stir in vanilla extract.
- Mix in sour cream (or Greek yogurt) and flour gently until smooth.
- Pour cheesecake batter evenly over cooled crusts, filling each about 3/4 full.
- Bake cheesecakes for 18-22 minutes until edges are set but centers still jiggle slightly.
- Cool completely at room temperature, then refrigerate for at least 3 hours.
- Decorate with festive gold caps by dusting mini chocolate squares with edible gold dust and placing one on each cheesecake bite. Attach a licorice string or black sugar pearl as a tassel.
Notes
Use room temperature cream cheese and eggs for smooth batter. Do not overmix after adding eggs to avoid cracks. Prebake crust to prevent sogginess. Watch baking time carefully to keep centers slightly jiggly. Optional water bath can reduce cracks. Apply gold dust gently with a small brush. Chill cheesecakes for at least 3 hours before decorating. For gluten-free crust, substitute graham crackers with almond flour or gluten-free crumbs. For dairy-free, use coconut yogurt and vegan butter.
Nutrition
- Serving Size: 1 mini cheesecake bi
- Calories: 180
- Sugar: 10
- Fat: 12
- Carbohydrates: 14
- Protein: 4
Keywords: mini cheesecake bites, graduation dessert, gold caps, easy cheesecake, party dessert, bite-sized cheesecake, festive dessert